DotNetNuke Hosting with ASPHostPortal.com

BLOG about DotNetNuke CMS, latest technology and Special DotNetNuke Hosting Package with ASPHostPortal.com

DotNetNuke Hosting - ASPHostPortal.com :: How to Install Google Analytic on DNN Website?

clock September 6, 2016 23:29 by author Dan

Installing Google Analytics in DotNetNuke is a fairly common request from many individuals and I know it can be a quite troubling question for most. The primary questions are how and where can I put the javascript code provided by Google. Well you have a few options. First you could put the code directly in the skin for the site, the advantages to that would be that you will automatically have the code on all pages, however, the disadvantage is that you cannot use that skin as is on another portal due to the site specific Google information. I personally go the route of adding a text/html module to my site and set it to show on every page and insert the script in a very specific location which I will discuss below. There are a few drawbacks to this method. First you will not get any statistics information on traffic to "edit pages" where other modules are not displayed and you also will not receive information regarding administration modules. However, in most circumstances this shouldn't be an issue.

The best way to include this information is to include the information in the Module header of the text/html module. This is to prevent the accidental removal of the script code if you happen to click inside the module as an admin to enter in-line edit mode. Below I will walk you through the steps needed to implement Google Analytics using this method. (NOTE: you can extend this for other javascript integrations if needed).

  • Add a new Text/HTML module to a page of your site, you can position it anywhere, but I recommend the bottom of the page as administrative users will still see the module when they are logged in
  • Edit the text of the module to contain no text
  • Enter the module settings from the SolPart Action Menu
  • Expand the "Advanced Settings" section
  • Check the box next to "Display Module On All Pages?"
  • Insert your Javascript code in the "Header" box. This will ensure that the data is always retained
  • Now under "Page Settings" -> "Basic Settings" un-check the following boxes
    • Display Container
    • Allow Print
    • Allow Syndicate
  • Ensure that the "Cache Time" is set to 0 (Caching appeared to cause issues with this implementation in my testing)
  • Click "Update" to save your changes

This should complete the setup. You may now test to ensure everything is functioning correctly. You can log out as an administrator and view your site and no extra content should be displayed however if you look at the generated source you should see your javacript listed. Google Analytics should update within about 15 minutes to show that they are receiving your data.

Best Recommended DotNetNuke Hosting

ASPHostPortal.com is the leading provider of Windows hosting and affordable DotNetNuke Hosting. DotNetNuke Hosting from ASPHostPortal.com provides a safe, reliable and performance-driven foundation for your DotNetNuke website. DotNetNuke is the perfect Content Management System for managing and developing your website with one of ASPHostPortal’s Hosting plans. ASPHostPortal has ability to support the latest Microsoft and ASP.NET technology, such as: WebMatrix, WebDeploy, Visual Studio 2015, .NET 5/ASP.NET 4.5.2, ASP.NET MVC 6.0/5.2, Silverlight 6 and Visual Studio Lightswitch, ASPHostPortal guarantees the highest quality product, top security, and unshakeable reliability, carefully chose high-quality servers, networking, and infrastructure equipment to ensure the utmost reliability.


DotNetNuke - ASPHostPortal.com :: Install module extension in DotNetNuke

clock September 1, 2016 18:46 by author Armend

How to Install module extension in DotNetNuke ?

What is actually a module extension in DNN? A module extension can be considered as plugin program that you can install on your site. Just imagine you have a car and you want to add a new sound system to your car, this new sound system can be considered as a plugin module to enhance your car looks and feeling.
To install a module extension in DNN, you will need to use a host account known super user account. Once login on the site, you will have a menu called host. Under this menu, you will find a menu called Extensions. Please click this menu.

A page contains extension modules list will appear.

Click the browse button to select the installation file. The installation file in DNN must in .zip format.

Click the Next button and you will be able to see the details of the extension specification.

If there is a release note, you will be able to see the what updates or changes that have been made.

If there is a license note, you will be able to review it as well. Tick the checkbox and click Next button to accept the license.

The installation will be fully completed if you do not see any warning or red text in the scrolling installation summary process


Best Recommended DotNetNuke Hosting

ASPHostPortal.com is the leading provider of Windows hosting and affordable DotNetNuke Hosting. DotNetNuke Hosting from ASPHostPortal.com provides a safe, reliable and performance-driven foundation for your DotNetNuke website. DotNetNuke is the perfect Content Management System for managing and developing your website with one of ASPHostPortal’s Hosting plans. ASPHostPortal has ability to support the latest Microsoft and ASP.NET technology, such as: WebMatrix, WebDeploy, Visual Studio 2015, .NET 5/ASP.NET 4.5.2, ASP.NET MVC 6.0/5.2, Silverlight 6 and Visual Studio Lightswitch, ASPHostPortal guarantees the highest quality product, top security, and unshakeable reliability, carefully chose high-quality servers, networking, and infrastructure equipment to ensure the utmost reliability.


DotNetNuke - ASPHostPortal.com :: How To Customizing Page Titles and Meta Data in DNN

clock Augustus 4, 2016 20:23 by author Armend

How To  Customizing Page Titles and Meta Data in DNN

There are several key fields that search engines use in their ranking algorithms: page title (that’s the text you see in the title bar of the browser), meta description (that’s text describing your page to search engines, which your visitors don’t normally see) and ‘H’ tags, which are your H1/H2/H3 tags denoting which are the headers in your content.

How you do this in DNN:

The page title and description are stored in the Page Settings. Simply open up the page settings for the current page, and you can edit these directly. Here’s the steps:

  • Login as an Administrator, then go to the ‘Edit Page’ drop down on the top right hand side of the screen.
  • Choose ‘Page Settings’ from that menu, and it will load up the settings for the page you’re currently browsing.
  • To modify the page title, edit the value in the ‘Page Title’ field. In my example below, I’ve chosen some words that we can assume match the keywords/phrases that our fictitious bike company uses. Try and keep the length below about 70 characters so that, when it gets displayed in a Search Engine Results Page (SERP), you can see the whole title.
  • To change the Page Description, type into the ‘Description’ box. Remember that your visitors won’t see this on your site. The key to a good description is again hitting your keywords, but doing so in a way that actually reads well. If your page gets included in a SERP, it’s likely that the search engine will use the Page Description as the two or three line description for your page. Try and keep it to under 150 characters so that it stands a good chance of displaying nicely in a SERP listing, and the ratio of your keywords to the rest of the text is not too diluted.
  • When you’re finished, click ‘Update Page’ – the settings screen will close and you’re finished. (You’ll note on my example I didn’t bother with the Meta Tags at all)

Overview: H Tags

DNN doesn’t enforce the use of any particular H tag, so you’re free to edit one into your content however you like. It’s also possible to define a custom skin for your DNN site that shows a H1 for a specific page value (such as the module title for a piece of content).

I’d recommend leaving any ‘H’ tags out of your skin and just making sure that you define a H1 tag for each separate piece of content that you write (like a blog post title, for example). But others may disagree with me and just be happy to define a H1 tag using the page name of each page. I prefer to customize every bit of content for maximum impact – but this does take much, much longer.

To make something a ‘H1’ in DNN, here’s how you do it:
Use the ‘Edit this Page’ button in the ‘Edit Page’ dropdown to enter edit mode for the current page.

  1. Hover over the ‘Pencil’ edit icon and click on ‘Edit Content’
  2. Type in your header (or select an existing header with your mouse)
  3. Use the style drop down to select ‘Heading 1’


About ASPHostPortal.com:

ASPHostPortal.com is The Best, Cheap and Recommended ASP.NET & Linux Hosting. ASPHostPortal.com has ability to support the latest Microsoft, ASP.NET, and Linux technology, such as: such as: WebMatrix, Web Deploy, Visual Studio, Latest ASP.NET Version, Latest ASP.NET MVC Version, Silverlight and Visual Studio Light Switch, Latest MySql version, Latest PHPMyAdmin, Support PHP, etc. Their service includes shared hosting, reseller hosting, and Sharepoint hosting, with speciality in ASP.NET, SQL Server, and Linux solutions. Protection, trustworthiness, and performance are at the core of hosting operations to make certain every website and software hosted is so secured and performs at the best possible level.


DotNetNuke - ASPHostPortal.com :: How To installing DotNetNuke 8.0.3 using WebMatrix

clock Julie 21, 2016 20:58 by author Armend

DotNetNuke is a widely used open source CMS for building web sites and web applications on the Microsoft Web Platform. DotNetNuke is often used in conjunction with WebMatrix, a free tool that allows for the creation, customization and publication of ASP.NET web
The following tutorial will demonstrate how quick and easy it is to get your DotNetNuke application up and running!

Installing DotNetNuke

To install the DotNetNuke application from WebMatrix:

  1. Select the App Gallery option.
  2. Choose the DotNetNuke Community Edition icon. The application can be given a new name or keep the default name.
  3. Select a database.
  4. Choose SQL Server and ensure that the Windows Integrated Authentication radio button is selected.
  5. Click Next.
  6. Once prompted to install DotNetNuke, click I Accept. The DotNetNuke Installation will take a few minutes to complete. Once completed, you will receive a confirmation message.
  7. Immediately after Installing DotNetNuke, load the DotNetNuke application by clicking the OK button.

Configuring DotNetNuke

To configure DotNetNuke in WebMatrix, use the Installation Wizard to complete the following steps:

  • Click the Run button on the menu ribbon. Be sure to run the root folder of the DotNetNuke application.
  • Upon running the DotNetNuke application, there will be three options for installation:
    • Customer
    • Typical
    • Auto
  • For purposes of this article, the Typical installation will be used.
  • The Installation Wizard will perform a permissions check. Upon completion, you will be notified.
  • After the permissions check, enter your database information.
  • Once all of the database information is provided, the Installation Wizard will install the database and create the connection for you.

    Note: The installation of the database could take a few minutes to complete. Once installed, a confirmation message will be provided.

  • Once the confirmation message is received, click Next to proceed.
  • Provide your host information on the next screen.
  • Click Next.


Once the installation is complete, you will be able to log into your DotNetNuke portal.


DotNetNUke - ASPHostPortal.com ::How To Reset the Passwords for All Users in a DNN Site

clock Junie 30, 2016 20:01 by author Armend

How To Reset the Passwords for All Users in a DNN Site

Now, before I go any further, it would be an absolute best practice to have and you’d be irresponsible if you didn’t have a formal policy to protect yourself and the clients you’re providing services to.  Have a clear understanding of how you accept sites, how you maintain them, and when you destroy your copies of them.  If you’re in support, I’d suggest destroying your backups as soon as your client confirms that their issue is solved.  The rule of thumb here, don’t keep copies.  Destroy them at your earliest convenience.  That being said, I am not a lawyer either, so you’ll want to review your policies and the laws in your region.

Resetting the Passwords for All Users

The context of this DNN tip is to allow you access to literally impersonate the users on a DNN site.  If the number of users is low, I’d suggest leaving this article now to use my DNN Demo Skin Objects.  Seriously, they’re pretty cool.  You should check them out.
Ideally, it would be convenient if you knew all of the passwords of the users on the site, but we won’t and we shouldn’t.  Instead, we’ll change every password for every user to “password” using the ASPX file below.  All you have to do is create an ASPX file in the root of the site, paste this code into it, and then view it in a web browser of your choice.  From there, it’s a single click to reset all of the passwords to “password.”

WARNING!!!  Never do this on a production site for any reason or put this file on a production server, anywhere.  Also, it should only be used for LEGAL and ETHICAL purposes.
The code below does the meat of the work for you, but you can just download the file by clicking the button below and save yourself some time.  

private int PortalId
    {
        get
        {
            return PortalController.GetCurrentPortalSettings().PortalId;
        }
    }
    protected void ProcessUsers(object sender, EventArgs e)
    {
        try
        {
            IterateThroughUsers();
        }
        catch (Exception ex)
        {
            Exceptions.ProcessModuleLoadException(this, ex, true);
        }
    }
    private void IterateThroughUsers()
    {
        var sb = new StringBuilder();
        var totalRecords = 0;
        sb.Append("
Updating Superusers
");
        var superUsers = UserController.GetUsers(false, true, Null.NullInteger);
        UpdateUserInfo(superUsers, ref sb);
        sb.Append("
Updating Normal Users
");
        var normalUsers = UserController.GetUsers(PortalId, -1, -1, ref totalRecords, true, false);
        UpdateUserInfo(normalUsers, ref sb);
        plcUserLog.Controls.Add(new LiteralControl(sb.ToString()));
    }
    private void UpdateUserInfo(ArrayList users, ref StringBuilder sb)
    {
        foreach (var user in users)
        {
            // convert the user object to UserInfo
            var oUser = (UserInfo)user;

            // update the password
            // REQUIRES: Change the enablePasswordRetrieval attribute to True in the web.config
            // for newer versions of DNN, use this:
            //MembershipProvider.Instance().ResetAndChangePassword(oUser, "password");
            var success = DotNetNuke.Security.Membership.MembershipProvider.Instance().ChangePassword(oUser, string.Empty, "password");
            sb.AppendFormat(
                success
                    ? "
{0} {1} ({2}) updated with a new password.
"
                    : "
{0} {1} ({2}) NOT UPDATED!
", oUser.FirstName, oUser.LastName,
                oUser.Username);
            // save the user
            UserController.UpdateUser(PortalId, oUser, false);
        }
    }

I hope this article helpful for you, happy Coding :)


DotNetNuke Hosting - ASPHostPortal.com :: 6 Steps to Make Your DotNetNuke Site SEO Friendly

clock Junie 28, 2016 21:55 by author Dan

Also often referred to as .NetNuke or DNN, DotNetNuke is essentially an open source platform for effective content management. Since this platform is proprietary, one can use it to create commercial as well as corporate websites e-publishing sites, extranets, intranets and even custom applications.

Microsoft SQL Server is the most commonly used database with this platform, however, DNN websites also often run on ASP.NET.

When one talks about website development using DNN, most DotNetNuke developers are of the opinion that this may not be the best platform since the basic integration comes with a range of issues related to search engine optimization. While this may be true to a certain extent, with DNN upgradation and customization, one can easily resolve these problems and develop a highly SEO friendly website for their business.

To be able to achieve this effectively, consider the following tips:

1. Remember to add meta-tags to all your web pages, especially for the description and page title. Make sure that the meta-tags include the primary keywords and that the titles are limited to 65 characters with all the spaces. It is strongly recommended that you select modules which help making the SEO simpler. A suggested module is that of Ventrian's News Articles which helps put in the title of the article on the page title automatically. You must also make sure that you provide unique page descriptions for each and every web page.

2. Make sure the content quality on your website maintains high standards. Make sure you select your keywords well. You can even do this with the help of one of the many tools that conduct comprehensive keyword research. Make sure that all the keywords you use are placed in a correct context. It is also important that you offer valuable and informative content to all your visitors.

3. With the help of your DotNetNuke Developers and SEO experts get as many quality back links as possible. This can also be pursued with the help of social media websites, e-publishing portals, blogs, forums and article directories. With the help of high quality and valuable content you will be able to attract attention from a range of high quality and authority websites from within your industry. While this may be a relatively time consuming process, the end result is totally worth the effort.

4. To create an SEO friendly website with DNN integration, it is important that you create an XML sitemap for your website. Make sure you submit this sitemap to all major search engines such as Yahoo!, Bing and Google. This sitemap is very different from the sitemap page that you create for your users. DNN helps create a sitemap file for submission dynamically.

5. DotNetNuke developers also need to create a robotos.txt file and place it in the root of your website. This will help the search engine spiders to crawl through your website.

6. Also have your developers write a decent and standard-complaint HTML code to help the spiders access and crawl through your website with ease. This can be done with the help of JavaScript and HTML layout tables and frames for your webpages.

Finally, make it a point to minimize all duplicate content by using the '301 redirect' effectively. With these tips you will be able to enhance the visibility of your DNN website.

DotNetNuke Hosting Recommendation

ASPHostPortal.com is Perfect, they have a suitable hosting plan for a starter in DotNetNuke Hosting. ASPHostPortal is the leading provider of Windows hosting and affordable ASP.NET Hosting. ASPHostPortal proudly working to help grow the backbone of the Internet, the millions of individuals, families, micro-businesses, small business, and fledgling online businesses. ASPHostPortal has ability to support the latest Microsoft and ASP.NET technology, such as: WebMatrix, WebDeploy, Visual Studio 2015, .NET 5/ASP.NET 4.5.2, ASP.NET MVC 6.0/5.2, Silverlight 6 and Visual Studio Lightswitch, ASPHostPortal guarantees the highest quality product, top security, and unshakeable reliability, carefully chose high-quality servers, networking, and infrastructure equipment to ensure the utmost reliability.


DotNetNuke - ASPHostPortal.com :: Tips To Add jQuery To your DotNetNuke Skin

clock Junie 23, 2016 20:30 by author Armend

Tips To Add jQuery To your DotNetNuke Skin

At this point you’ll be hard pressed to find a site that does not use jQuery. It has become a requirement for many to bring flash like experience in the form of photo sliders or fast responding ajax applications.
Over that time adding jQuery to DotNetNuke (DNN) has not always been straight forward. DNN ships jQuery as part of the core framework and you might assume that it’s always available. But one of the most widely unknown issues is that it must be requested on every page in order for it to be available.


Common Symptoms:

  • Main menu does not show sub items.
  • Homepage slider does not rotate.
  • Layout is malformed.
  • Works fine when logged in but not when logged out.

When you login as an administrator jQuery will always be available since the control panel bar request it. However if you logout on that same page it might not have been requested by any module or skin object on that page.

Not Recommended Ways To Add jQuery

  • Do Not: Add script tag into page settings or in your skin file.
  • Why? This will potentially add multiple jQuery reference to your page. The real issue is if any plugins are registered between the first reference and the second reference they won’t be available after the second reference is instantiated.

<script type="text/javascript" src="//ajax.googleapis.com/ajax/libs/jquery/1.10.2/jquery.min.js"></script>

Recommended Way To Add jQuery

In your skin file you you can reference and add the control for jQuery. This will ensure that jQuery is available on every single page and that it will only be referenced one time. You also get the benefit of the Client Dependency Framework (CDF).

<%@ Register TagPrefix="dnn" TagName="jQuery" src="~/Admin/Skins/jQuery.ascx" %>
<dnn:jQuery runat="server"></dnn:jQuery>

You can optionally add public properties to register jQuery UI, DNN jQuery Plugins and Hover Intent.

<dnn:jQuery runat="server" jQueryUI="true" DnnjQueryPlugins="true" jQueryHoverIntent="true"></dnn:jQuery>

Note: The search skin object will also register jQuery.


DotNetNUke - ASPHostPortal.com :: How To Create An Announcement With A Slider

clock Junie 8, 2016 20:57 by author Armend

DotNetNuke has come a long way recently with making things much more w3 compliant. This has allowed for more than just cleaner code; it has also allowed for much more control of your website through jQuery and CSS. Also, according to the forums, it looks like things are getting even better for compliance and control. In this tutorial, we will tell you how to create an announcement with a slider in DotNetNuke.


One of our favorite updates of DNN modules to this new compliance, is the DNN Announcements module. With the latest release, we now have the ability to set up the announcements as a list and apply some cool jQuery to it. We decided that we wanted to have the main image fade in and out and the title and description to slide in from the bottom. We came across the s3Slider jQuery plugin which seemed to provide exactly what I was looking for. We have outlined the steps below on how to add it to your DotNetNuke site.

The HTML

  • Add the Announcements module to your page.
  • Click the “Settings” link.
  • Expand the “Announcements Settings”
  • Remove exisiting code from Header Template, Item Template, and Footer Template.
  • In the “Header Template:” text area, enter the following code:

<div id="s3slider">
<ul id="s3sliderContent">

  • In the “Item Template:” text area, enter the following code:

If you want your description area to be at the top of the image area, use the class top in the span.
If you want your description area to be at the bottom of the image area, use the class bottom in the span as I have here.

<li class="s3sliderImage">
[IMAGESOURCE]<span class="bottom"><strong>[TITLE][EDIT]</strong><br />
[DESCRIPTION]<br />
[READMORE]</span>
</li>

  • In the “Footer Template:” text area, enter the following code:

<li class="clear s3sliderImage"></li>

  • Also, in the “Footer Template” area close out the ul and div that was started in the “Header Template” area

The CSS

In your skin.css file, insert the following styles: (note the widths and heights in the CSS. They need to be exactly the same as the image for the announcemnts.)

#s3slider { width: 500px; height: 242px; position: relative; overflow: hidden;}
#s3sliderContent { width: 500px; position: absolute; top: 0; margin-left: 0;}
.s3sliderImage { float: left; position: relative; display: none;}
.s3sliderImage span { position: absolute; font: 14px/21px Arial, Helvetica, sans-serif; padding: 10px 13px;  width: 500px; background-color: #000; filter: alpha(opacity=70); -moz-opacity: 0.7; -khtml-opacity: 0.7; opacity: 0.7; color: #fff; display: none;}
.top { top: 0; left: 0;}
.bottom { bottom: 0; left: 0;}

The jQuery

Now that we have all of that in place, we can add the jQuery to make it work.

  • Include a refrence to jQuery in your skin. This is already done if widgets are inabled on your site.
  • Download the files from the s3Slider site. http://www.serie3.info/s3slider (link opens in new window)
  • Upload the s3Slider.js file to your skin folder.
  • In your skin file (for example: skin.ascx), enter the following code: (you can put this at the top or the bottom of your skin)

<script type="text/javascript" src="<%= SkinPath%>s3Slider.js"></script>
<script type="text/javascript">
    $(document).ready(function() {
       $('#s3slider').s3Slider({
          timeOut: 7000
       });
    });
</script>

  • Now just start adding the content of your announcements! Be sure to make your images the same size as what is set in the CSS.

DotNetNuke Hosting Recommendation

ASPHostPortal.com

ASPHostPortal.com is Perfect, they have a suitable hosting plan for a starter in DotNetNuke Hosting. ASPHostPortal is the leading provider of Windows hosting and affordable ASP.NET Hosting. ASPHostPortal proudly working to help grow the backbone of the Internet, the millions of individuals, families, micro-businesses, small business, and fledgling online businesses. ASPHostPortal has ability to support the latest Microsoft and ASP.NET technology, such as: WebMatrix, WebDeploy, Visual Studio 2015, .NET 5/ASP.NET 4.5.2, ASP.NET MVC 6.0/5.2, Silverlight 6 and Visual Studio Lightswitch, ASPHostPortal guarantees the highest quality product, top security, and unshakeable reliability, carefully chose high-quality servers, networking, and infrastructure equipment to ensure the utmost reliability.


DotnetNuke Hosting - ASPHostportal.com :: How to Integrate DotNetNuke with Sharepoint?

clock Junie 7, 2016 23:21 by author Dan

DotNetNuke has already established itself as one of the most popular as well as preferred web content management systems, based on Microsoft. Net. DotNetNuke websites are known to offer excellent user experience while also letting the brands enhance their identity. The recent trend is that of integrating this content management system with that of Microsoft SharePoint, of which the latest version has recently come out in the form of SharePoint 2013.

The integration is quite helpful for the businesses in a number of ways. Here is a brief overview of how the integration of DotNetNuke with SharePoint can be executed with success.

Effective Document Management with SharePoint

SharePoint is undoubtedly the most preferred as well as even sought after system for document management, helpful for businesses of varying size or nature. Now, this platform is built into cloud, which allows maximum storage and accessibility. Consequently, the professionals in a team have an opportunity to share as well as collaborate on apparently large amounts of data and documents. Additionally, the platform integrates effectively with Outlook and this enables enhancement of the significance of the social tools. All this leads to a carefully organized atmosphere. The team members can also convert the raw data into important interactive reports.

Integration of DotNetNuke with SharePoint

The best thing about integrating the web content management system with the web application development platform is that the two of them integrates quite seamlessly. An automatic integration implies that no further efforts are required when it comes to operating the system. The DNN Community can merge with the platform in a rather hassle- free manner by means of using the custom modules. The primary idea, here, is to design a system that allows the platform to communicate from behind a firewall with the people facing the website. Now, all this means that the documents can be pushed into the portal on the DotNetNuke website with higher level of safety and efficiency. At the same time, the filter rules can be designed to track down the individual documents to find out as to where they go.

DNN Enterprise and SharePoint Connector

In instances where the platform is used as the document management system, integration of the same with DotNetNuke Enterprise Edition is actually of real benefits. The custom integration saves a lot of money of the enterprise while investment that is made is actually worthy.

The DNN Enterprise SharePoint connector comes up as a powerful and significant feature, supporting both 2007 and 2010 versions of the platform. The firewall issues can be avoided at the same time. Content, on the other hand, stays fresh and is published directly from the SharePoint Document Library. It is the DotNetNuke role- based security network that performs the essential function of protecting the published documents.

Making Use of the SharePoint Folder Provider


The SharePoint Folder is particularly useful in integration with DotNetNuke 6. It enables the DNN users to store as well as synchronize the files contained in the document libraries, located in 2010 version of this platform.

Here is an overview of the features of this Folder and the way it helps:

The communication between the web application development platform and the DotNetNuke 6 becomes faster and more direct by virtue of the folder. It paves the way for multiple providers to indicate to different document libraries from either the similar platform based sites or from the different ones.

The SharePoint Folder facilitates a number of functionalities such as addition cum deleting of folders, uploading, downloading, renaming of files along with synchronization of the files and folders. Above all, this Folder actually acts as a strong base for several DNN modules, which make use of the DotNetNuke file system. Custom SharePoint development teams can help you build projects within allocated budgets and time schedules.

Best DotNetNuke Hosting Recommendation

ASPHostPortal.com provides its customers with Plesk Panel, one of the most popular and stable control panels for Windows hosting, as free. You could also see the latest .NET framework, a crazy amount of functionality as well as Large disk space, bandwidth, MSSQL databases and more. All those give people the convenience to build up a powerful site in Windows server. ASPHostPortal.com offers DotNetNuke hosting starts from $5. We also guarantees 30 days money back and guarantee 99.9% uptime. If you need a reliable affordable DotNetNuke Hosting, we should be your best choice.


DotNetNuke - ASPhostPortal.com :: How To Create A Web farm For Your DotNetNuke Website

clock Junie 3, 2016 20:40 by author Armend

How To Create A Web farm For Your DotNetNuke Website

With a little luck and a lot of hard work there will come a time when your website’s popularity outgrows the capabilities of a single server. It’s time then to consider moving to a server-cluster also called web farm where you can host your website over multiple servers, balancing and shifting the load all across them so that your visitors continue getting the fast website experience that they’re used to.

Server clustering is now a part of Windows Server and IIS 7, so you can easily set up your web farm and get a dramatic boost in your website’s performance by setting up shared configuration for your website with 2 or more servers.
By using a server farm you can also avoid buying newer and costlier hardware, putting older servers to work to share the load at a lower cost. Additionally a web farm also enhances the security by creating redundancy which will keep the website online and functioning even if one of the server fails.
In this article we will learn how to set up your web server farm through IIS 7 Shared configuration feature for your DotNetNuke website.
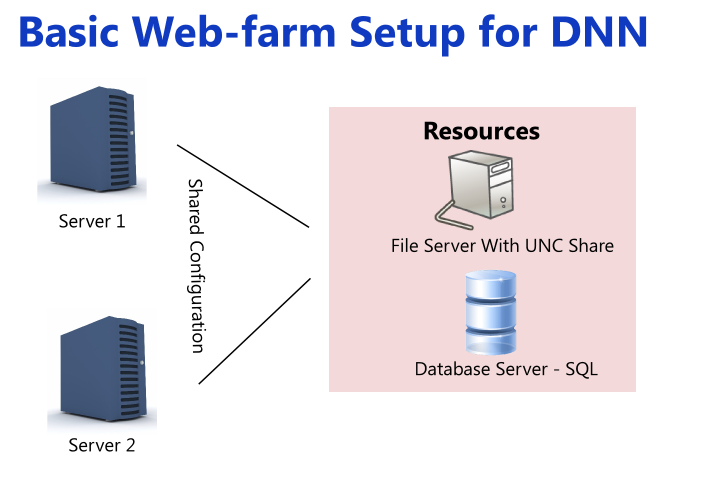
 

Requirements for a DotNetNuke Web Farm

Setting up a web farm for DotNetNuke requires a setup in which there are at least two servers to handle the client requests. The servers access the files from a separate file server and the database from a special database server.  The requests are routed to the servers by a special load balancer which makes sure that the requests are evenly divided between the servers.

If your application does not have major file writing operations you can also store the files locally on the two servers and remove the file server from the configuration. This server setup uses file replication to store the files across all front-end servers and any file change on one of the servers is replicated across all servers. This scheme is not suitable if your servers need a lot of file updates and changes because of the extra load that will impose.
Setting this up on IIS7 has become easier than ever thanks to the new Shared configuration feature of IIS7 which allows you to place a common configuration file that will automatically configure all the front-end server you possess.

There are two stages to setting up a web farm for DotNetNuke. You have to configure DotNetNuke to work with a web farm and you have to configure a web farm environment At the server level.
Let’s discuss the configuration of DotNetNuke first. We’ll learn how to configure IIS7 shared configuration a little while later.

Setting up DotNetNuke for Web farm

Modifying the Web.config File to Enable Web Farm Support for DotNetNuke
DotNetNuke uses the web.config to store application settings that decide how it will work. To enable the support for web-farms you have to tell DotNetNuke that it’s in a farm environment. To do this you need to enable web farm support in the Config file.

  • Create Common Machine Keys : DotNetNuke requires that the machine keys of all the frontend servers in the web farm be identical. You can choose the machine keys of any server and must copy it across the servers. The machine two keys to replicate are ‘MachineValidationKey’, and ‘MachineDecryptionKey’.

  The Keys are in configuration->appsettings section of the web.config file.

  • Enable Web Farm : Check that the EnableWebFarmSupport setting is set to ‘True’ in the Configuration->AppSettings section of the configuration file. If this setting does not exist then add it.
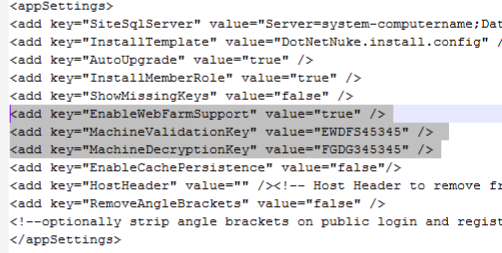
  • Add Support for DB Logging Provider : In a farm environment the logs must be kept in a database. You need to setup DotNetNuke to keep the logs in a database. To do this make sure that the value of the defaultProvider node in configuration->dotnetnuke->logging node is set to ‘DBLoggingProvider’.
  • Setting up the Scheduler : DotNetNuke’s scheduler which looks after the regular maintenance tasks needed to keep the website running popularly must also be configured according to the needs of the web farm. Some of the tasks must be run on each machine, while others must be run on specific ones. You’ll need to change the schedule manually.

To change the task schedule first log in as the Super User and go to the Schedule option of the Host menu. Clicking on the button ‘Run on Servers’ will bring a text-box where you can fill the server name where you want each task to run.

The tasks that you may need to modify include : DotNetNuke.Services.Scheduling.PurgeScheduleHistory, DotNetNuke.Services.Log.Eventlog.SendLogNotifications, DotNetNuke.Services.Search.SearchEngineScheduler, DotNetNuke.Modules.Admin.ResourceInstaller.InstallResources, and DotNetNuke.Services.FileSystem.SynchronizeFilesSystem.

You’ll also need to enable the task DotNetuke.Services.Cache.PurgeCache. Make sure this task is enabled and updated.

  • Enable File Based Caching : DotNetNuke does not support database based caching in a web farm scenario. To optimize the caching performance the caching should be file based only. Make sure the node configuration->dotnetnuke->caching has the value ‘FileBasedCachingProvider’ for the attribute ‘defaultProvider’.

Configuring IIS 7 To Work With Your Web farm

Before IIS7 setting up a web farm on IIS was a non-trivial affair because IIS offered no automated replication and configuration across all servers. From IIS7 you can create a standard configuration on one server and replicate it across all servers by sharing only some configuration files. This makes it much more easier to create a web farm for your websites.
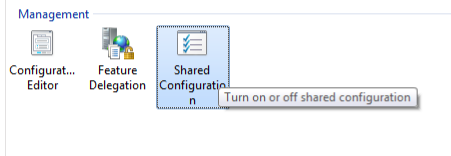
First configure your web server as usual to host the website, and when you’ve set up everything use the ‘Shared Configuration’ facility of IIS to export the server configuration files. The files should be exported to a UNC Share location which will be accessed by all the servers in the web farm for the configuration settings.
You will have to similarly enable shared configuration across all your servers and point to the same location where you have the original configuration settings saved. All the servers will copy those configuration settings.
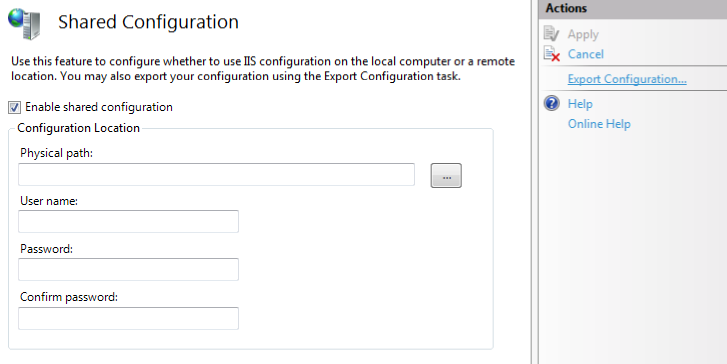
You can easily setup the file server using the following command on the command prompt of the server which you want to use as the file server. Otherwise you can also use the windows graphical interface to set the necessary user permissions for the shared area.

md %SystemDrive%\serverconfig
net share serverconfig $=%SystemDrive%\serverconfig /grant:Users,Change

Note that we are also granting the users the right to modify the shared  contents.

The UNC share will also act as a file shared server, and the servers will grab the files from the share to serve to the client requests. Make sure that you set the file server location as the Home directory of the web server to enable this. A file share is essential to a DotNetNuke web farm.

This concludes the tutorial to establish a Web farm for your DotNetNuke website. If you have made the configuration changes to both DotNetNuke and IIS then your web farm environment should be up and running.


About ASPHostPortal.com

We’re a company that works differently to most. Value is what we output and help our customers achieve, not how much money we put in the bank. It’s not because we are altruistic. It’s based on an even simpler principle. "Do good things, and good things will come to you".

Success for us is something that is continually experienced, not something that is reached. For us it is all about the experience – more than the journey. Life is a continual experience. We see the Internet as being an incredible amplifier to the experience of life for all of us. It can help humanity come together to explode in knowledge exploration and discussion. It is continual enlightenment of new ideas, experiences, and passions

Author Link


 photo ahp banner aspnet-01_zps87l92lcl.png

Corporate Address (Location)

ASPHostPortal
170 W 56th Street, Suite 121
New York, NY 10019
United States

Tag cloud

Sign in