
September 17, 2014 09:18 by
 Kenny
Kenny
The Simple Way to Install DotNetNuke
DotNetNuke is a Web-content management platform for those who use the Microsoft ASP.NET framework. Based on your company needs, whatever version of DNN you choose, it will be a significant cost saving venture over other options. Installing DotNetNuke is not a task well-suited for beginners to this sort of website framework. If you are familiar with websites, databases, and ASP.NET, you can use these instructions to learn how to install DotNetNuke.

Check the DotNetNuke installation requirements before getting started. To install DotNetNuke, you need a database with either Microsoft SQL Server 2005/2008 or SQL Express. If you have an older version of DotNetNuke 5.2 or earlier, you can use SQL Server 2000. You should also have a Microsoft IIS (Internet Information Services) with version 5 or higher, and the Microsoft .NET 3.5 SP1 framework. This service pack is available through the Windows Update feature.
Download the latest version of DotNetNuke to your computer, and unzip the file.
Use the FTP software of your choice to connect to your website, and upload the installation files into the directory of your choice. If necessary, create the directory where you want to install DotNetNuke on your server.
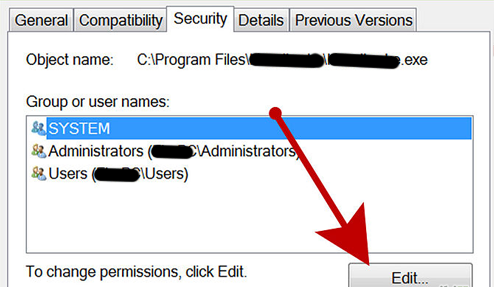
Select the folder where DotNetNuke is located. Click "Properties," choose the "Security" tab, and add the necessary user permissions. Use either the local ASP.NET service (for Windows 2000 and XP) or the local Network Service account (for Windows 2003, Vista, 2008, or 7). You should have permission to modify the folder.
- Open the IIS server console. Go to "Start" > "Run" > INETMGR. Click on the "websites" node, and select the "Default website" node.
- Right click on the DotNetNuke folder. Click "Convert to Application." If this option is not available, select "Properties" and add the application.
Install DotNetNuke with SQL Express.
- Open your web browser, and go to: http://yoursite.com/dotnetnuke.
- Walk through the installation wizard as presented on the screen. The database information should already be configured, and you should not need to change it.
- Look for the default login information for the "host" and "admin" users, which is shown when installation is complete.
- Log in immediately, and change the passwords to protect against hacking.
Install DotNetNuke with SQL Server 2005/2008 for your database server.
- Open SQL Management Studio, and connect to your database server.
- Walk through the installation wizard as presented on the screen.
- Create a new database by expanding the server node, then the databases node, and filling in necessary values for all the database properties.
- Set up the SQL user and security account, and choose the appropriate integrated-security or user-security setting under the "server/security" node.
- Open your web browser, and go to: http://yoursite.com/dotnetnuke.
- Walk through the installation wizard as presented on the screen. Choose SQL 2000/2005/2008, and follow the security steps according to the option chosen in the previous steps. Test the database connection.
- Finish the installation wizard, and look for the default login information for the "host" and "admin" users.
- Log in, and immediately change the passwords for those accounts to protect against a hack.
Best and Cheap DotNetNuke Hosting Provider
Are you looking for best and cheap DotNetNuke Hosting Provider? ASPHostPortal is the answer. ASPHostPortal.com is a windows-based hosting service provider. ASPHostPortal.com offers the most reliable and stable DotNetNuke 7.3 web hosting infrastructure on the net with great features, fast and secure servers. Our hosting can be done via USA, Amsterdams or Singapore based server. Depending on your requirements, we can scale so we can deliver the right service for the right price. All of our windows hosting plan supports DotNetNuke 7.3 and you can install DotNetNuke 7.3 with just one click.