DotNetNuke Hosting with ASPHostPortal.com

BLOG about DotNetNuke CMS, latest technology and Special DotNetNuke Hosting Package with ASPHostPortal.com

DotNetNuke Hosting - ASPHostPortal.com :: GetTab Method without DNN Context

clock November 14, 2016 10:19 by author Dan

According to sunblognuke website, As you know, the simple method GetTab(int tabid) was obsolete and has been replaced by GetTab(ByVal TabId As Integer, ByVal PortalId As Integer, ByVal ignoreCache As Boolean). If you want to call the new method, we have to pass the additional parameter “PortalId”.

In common,  the object PortalSettings can be easy to get with DNN context, such as special dnn module & page; however, it may be inaccessible in some sceneries, such as separate aspx page or handler. Then is there any way to get the correct tab info with this new method? Now there is a simple trick to do it with passing into Null.NullInteger as the parameter PortalId. So the coding looks like that:

var tabController = new TabController();
var blogPage = tabController.GetTab(tabID, Null.NullInteger, false);


Deeping into the source code, you will find out that it always tries to get the correct PortalId for this tab/page object:

//if we do not know the PortalId then try to find it in the Portals Dictionary using the TabId
portalId = GetPortalId(tabId, portalId);

//if we have the PortalId then try to get the TabInfo object
tab = GetTabsByPortal(portalId).WithTabId(tabId) ??
        GetTabsByPortal(GetPortalId(tabId, Null.NullInteger)).WithTabId(tabId);


Hope this trick & tip helps if someone has the same issue.

Best Recommended DotNetNuke Hosting

ASPHostPortal.com is the leading provider of Windows hosting and affordable DotNetNuke Hosting. DotNetNuke Hosting from ASPHostPortal.com provides a safe, reliable and performance-driven foundation for your DotNetNuke website. DotNetNuke is the perfect Content Management System for managing and developing your website with one of ASPHostPortal’s Hosting plans. ASPHostPortal has ability to support the latest Microsoft and ASP.NET technology, such as: WebMatrix, WebDeploy, Visual Studio 2015, .NET 5/ASP.NET 4.5.2, ASP.NET MVC 6.0/5.2, Silverlight 6 and Visual Studio Lightswitch, ASPHostPortal guarantees the highest quality product, top security, and unshakeable reliability, carefully chose high-quality servers, networking, and infrastructure equipment to ensure the utmost reliability.


DotNetNuke Hosting - ASPHostPortal.com :: How to use Google Gmail SMTP in DNN website?

clock November 10, 2016 07:17 by author Armend

How to use Google Gmail SMTP in DNN website?

In this article we will explain how to use Google Gmail SMTP in DNN. If you want to use Gmail SMTP in your DNN website, this can be easily done by specifying the correct port 587 in the SMTP settings. Unfortunately, there is no port number field supplied in the SMTP settings form. So in order to include the port number, you just need to add the smtp.gmail.com:587 in the SMTP settings.
In order to set the SMTP settings, you will need to login as super host account. Note this is a super administrator account so the basic administrator account will not get the access to the host menu. Under the host settings in the advanced settings tab, you will see a section for SMTP settings. You just simply need to use the following settings. Just replace the email and password of your own.


Best Recommended DotNetNuke Hosting

ASPHostPortal.com is the leading provider of Windows hosting and affordable DotNetNuke Hosting. DotNetNuke Hosting from ASPHostPortal.com provides a safe, reliable and performance-driven foundation for your DotNetNuke website. DotNetNuke is the perfect Content Management System for managing and developing your website with one of ASPHostPortal’s Hosting plans. ASPHostPortal has ability to support the latest Microsoft and ASP.NET technology, such as: WebMatrix, WebDeploy, Visual Studio 2015, .NET 5/ASP.NET 4.5.2, ASP.NET MVC 6.0/5.2, Silverlight 6 and Visual Studio Lightswitch, ASPHostPortal guarantees the highest quality product, top security, and unshakeable reliability, carefully chose high-quality servers, networking, and infrastructure equipment to ensure the utmost reliability.


DotNetNuke Hosting - ASPHostPortal.com :: How to Solve Background Issues in DotNetNuke

clock November 7, 2016 11:36 by author Dan

According to webascender article, If you skin sites regularly for DotNetNuke, you may have run into a problem with background images or colors showing up in the FCK editor on your sites or in the background of the Link Gallery window that pops up on your site.  These two issues both have simple solutions that will save you time and frustration.

FCK Editor Background

When coding CSS, the typical place to insert a background image or color is through the BODY selector.  This selector will manipulate the background of your site, but will also change the BODY tag inside an iFrame that is incorporated when you edit textboxes through the built-in FCK Editor in DotNetNuke.  If you have a dark background and text color, the text in the FCK Editor will be unreadable and will be manipulated by whatever text manipulating properties you have on your BODY tag.


In DotNetNuke, a Body ID tag is automatically added to the BODY tag of your site.  Putting all background and related properties in this #Body selector will prevent the FCK Editor’s BODY tag from inheriting any unnecessary style changes. Making this switch will enable you to view text in the FCK Editor as it’s meant to be, instead of inheriting aspects of the BODY tag.

Link Browser Background

This problem is related to the FCK Editor Background issue we see in DotNetNuke.  The Link Gallery box also has an issue with inheriting backgrounds from the BODY tag.  The Link Gallery box is the window that pops up when you try to insert a link in the FCK Editor and click “Browse Server.”  Dark text is unreadable when your background is dark.  This issue can be fixed by adding a suitable background color to the #Table2 selector in your skin.css file.

Best Recommended DotNetNuke Hosting

ASPHostPortal.com is the leading provider of Windows hosting and affordable DotNetNuke Hosting. DotNetNuke Hosting from ASPHostPortal.com provides a safe, reliable and performance-driven foundation for your DotNetNuke website. DotNetNuke is the perfect Content Management System for managing and developing your website with one of ASPHostPortal’s Hosting plans. ASPHostPortal has ability to support the latest Microsoft and ASP.NET technology, such as: WebMatrix, WebDeploy, Visual Studio 2015, .NET 5/ASP.NET 4.5.2, ASP.NET MVC 6.0/5.2, Silverlight 6 and Visual Studio Lightswitch, ASPHostPortal guarantees the highest quality product, top security, and unshakeable reliability, carefully chose high-quality servers, networking, and infrastructure equipment to ensure the utmost reliability.


DotNetNuke Hosting - ASPHostPortal.com :: Easy Ways to Sync Google Analytic with DotNetNuke

clock Oktober 31, 2016 09:06 by author Dan

According to Ben J Schmidt (web designer) article, Let's face it, if you have a website, you are dying to know how many page views your site is getting and just how effective all your ads and SEO is working. Thanks to Google Analytics for DNN, it is easier than ever.

Google Analytics is a free, fully featured website tracking system. It can even synced with Google Adwords to track how different ads work with getting visitors and conversions on your site.

How does Google Analytics work?

A piece of javascript is inserted into any page you want tracked by Google. Every time a viewer looks at your website, it is recorded by Google and tells you all of the pages they viewed with in your website. All the data is collected and stored in your Google account under Analytics.

Integrating Goolge Analytics Into Your Site

Putting javascript into a site can be tough, especially if its already been made or the website is template. However, if you are using DNN, as your content management system, it's as easy as 1,2,3, thanks to the DotNetNuke Google Analytics module. This is a free module that can easily be integrated into your pre-existing Dot Net Nuke site. This module puts the javascript for Google Analytics into your DNN page. The Google Analytics module is a light-weight module that has been designed not to place a heavier load on your website.

Installing your Module on DNN 6:

  1. Login/setup an account at Google Analytics
  2. Login to your DNN Portal as a superuser or host account
  3. Rollover host and go to extensions. Click on the Available Extensions Tab.
  4. Click on the install button next to the Google Analytics module. After the module has been installed, it will appear under the 'Module' drop down list in the Control Panel, under the name "Google Analytics."
  5. On the homepage of your DotNetNuke portal, click 'Add New Module' and add the "Google Analytics" to the page. You will be able to physically see the module in 'Edit' mode, but the module will disappear once logged out of DNN.
  6. To have all pages on your website tracked, click on the 'Settings' control for the Google Analytics module you created, then click on the 'Advanced Settings' section and check the 'Display Module on All Pages'.

This is a great and simple module that allows you to easily check your traffic and look for areas that need some touch ups.

Best Recommended DotNetNuke Hosting

ASPHostPortal.com is the leading provider of Windows hosting and affordable DotNetNuke Hosting. DotNetNuke Hosting from ASPHostPortal.com provides a safe, reliable and performance-driven foundation for your DotNetNuke website. DotNetNuke is the perfect Content Management System for managing and developing your website with one of ASPHostPortal’s Hosting plans. ASPHostPortal has ability to support the latest Microsoft and ASP.NET technology, such as: WebMatrix, WebDeploy, Visual Studio 2015, .NET 5/ASP.NET 4.5.2, ASP.NET MVC 6.0/5.2, Silverlight 6 and Visual Studio Lightswitch, ASPHostPortal guarantees the highest quality product, top security, and unshakeable reliability, carefully chose high-quality servers, networking, and infrastructure equipment to ensure the utmost reliability.


DotNetNuke Hosting - ASPHostPortal.com :: Integrating Active Directory with DNN

clock Oktober 27, 2016 07:35 by author Armend

Microsoft Active Directory (AD) is the leading identity management platform for companies. AD has powerful identity management processes that help you manage your users, groups and resources in a centralised, secure corporate directory. Active Directory integrated with DNN gives you powerful, seamless capabilities to control real-time access to your DNN site directly from Active Directory.

The standard approach for managing users in DNN is to use the native, isolated user store that is maintained within the confines of the DNN application. This is what comes out of the box. But if your employees already use AD accounts to access your company network you might want to avoid having two completely disconnected user directories.
When an employee joins, leaves or changes roles within the organization, their accounts and access to applications must be added, removed or modified. When this does not occur in a timely manner, the organization is exposed to the risk of accidental or intentional behaviors that can lead to security breaches or the disclosure of sensitive information. So you really want to control access to all your company websites with a single login  controlled by Active Directory as the single point of truth for user identity. This allows for the automatic provisioning, updating and deleting of user accounts in your DNN site whenever the user logs in, without the need for administrators to make manual changes in your DNN or Evoq  site.

Concept

Below is a simple illustration showing how DNN Platform can integrate with Active Directory. In this solution we are relying on LDAP (Lightweight Directory Access Protocol) to consume information from Active Directory.


  • Active Directory server provides an LDAP protocol that exposes the AD user data store.
  • DNN Platform is hosted on the IIS server that is member of the Active Directory domain.
  • Corporate users (employees) are automatically signed in to the DNN Platform.
  • Clients using Internet connection can still view DNN website as a Guest or a Registered User (if they manually sign in to the DNN).

Advantages

  • Leverage investments in the Active Directory and DNN.
  • One source of authority and group information, which is Active Directory.
  • One password for DNN and Active Directory account means reduced IT workload and increased security. Passwords are not stored in DNN.
  • Self Service Password Reset - when the Active Directory password is expiring, let your users update their own passwords.
  • Centralized audit trail – all sign-in tasks are stored in one place which is Active Directory logs, which simplifies compliance and enables cross-application analysis.
  • Approach leverages Microsoft’s Integrated Windows Authentication to authenticate users to DNN when they are logged in to their office computer. When employees are on the corporate network and signed in with their Windows credentials, they can use Desktop single signon to auto-login (from a PC or Mac) to get one-click access to their web applications. There’s no need for additional usernames or passwords, just like on-premise apps.
  • Increased security and greater peace of mind.

Implementation

All the features mentioned above can be easily implemented in your DNN by the:

  •     Paid “AD-Pro Authentication” module.
  •     Free “Auth: Active Directory” module.

“AD-Pro Authentication” is an option for customers that have more unique needs.

Corporate Users Need AD-Pro

Below are the few benefits that “AD-Pro Authentication” can provide for your users:

  • New Active Directory users can immediately sign into DNN and start work.
  • When employees or contractors leave the company, corresponding Active Directory user accounts will be disabled, “AD-Pro Authentication” will block access for those users to immediately  prevent unauthorized access and data loss.
  • Active Directory profile fields like username, email address, first name, profile picture are pushed to DNN on sign-in process. You can also easily configure which fields needs to be synced, including custom Active Directory profile fields.
  • You can specify which Active Directory groups should be imported into DNN. This is done via “Role Manager” that allows you to create a advanced mappings between AD groups and DNN roles. For example: if AD user belongs to group “Sales” assign him to DNN role “Employee and Sales”.
  • “Role Manager” allows you to define “Authorization group(s)”. Only AD users who belong to one of the “Authorization Group” will be able to login to DNN.
  • "AD-Pro Authentication" supports Integrated Windows Authentication (IWA) also known as Single Sign On (SSO).
  • "AD-Pro Authentication" allows you to configure DNN with multiple platforms and companies, that's because the module can work with multiple Active Directory domains.
  • When a Active Directory user with an expired password tries to sign into DNN, he is prompted to enter the existing password and a new password. Once that user enters a valid new password, user is signed to DNN.
  • The complexity of a new password is defined by the AD security policies where are defined attributes like: password minimum length, whether the password must contain digits or special characters, how often the password expires and how long to prevent reuse of old passwords.

Note: Active Directory user passwords are never saved in DNN. You can be sure that passwords are not stored anywhere outside the Active Directory.

Summary

Integrating your DNN site with Microsoft Active Directory helps you with:

  • Authenticating users
  • Creating and deleting user accounts
  • Storing user accounts and passwords.
  • Calling enterprise directories to look up user identity details.
  • Integrating with identity systems from other platforms or companies.

Best Recommended DotNetNuke Hosting

ASPHostPortal.com is the leading provider of Windows hosting and affordable DotNetNuke Hosting. DotNetNuke Hosting from ASPHostPortal.com provides a safe, reliable and performance-driven foundation for your DotNetNuke website. DotNetNuke is the perfect Content Management System for managing and developing your website with one of ASPHostPortal’s Hosting plans. ASPHostPortal has ability to support the latest Microsoft and ASP.NET technology, such as: WebMatrix, WebDeploy, Visual Studio 2015, .NET 5/ASP.NET 4.5.2, ASP.NET MVC 6.0/5.2, Silverlight 6 and Visual Studio Lightswitch, ASPHostPortal guarantees the highest quality product, top security, and unshakeable reliability, carefully chose high-quality servers, networking, and infrastructure equipment to ensure the utmost reliability.


DotNetNuke Hosting - ASPHostPortal.com :: DotNetNuke Vs WordPress Vs Joomla Vs Drupal

clock Oktober 24, 2016 12:45 by author Dan

According to Grace Hughes article, DotNetNuke, often referred to as DNN Evoq is among the best open source CMS systems available on the internet. Since its inception it has proven itself to be a top performer with respect to effective management of a website system.

However, there are still a number of other CMS systems such as WordPress, Joomla and Drupal that continue to remain popular choices among developers and systems administrators.

How does DNN compare with these systems?

It is good to know that many of the best websites on the internet today have been developed by DNN developers. This framework continues to improve with each coming year, providing developers a chance to explore its skins, default layers and modules that just keep getting better and better.

The skinning engine is extremely user-friendly and flexible and so are the security access, groupings and role assignments. A major benefit DNN offers over its competitors is the fact that its admin is entirely integrated into the website, allowing web administrators to easily make changes as and when required. Customization on DNN is also extremely simple.

DNN versus WordPress

DotNetNuke and WordPress are both excellent platforms for those who wish to build web presence. However, DotNetNuke is definitely more powerful and easy to use. On the other hand, WordPress is easier to set up and install, but the new DotNetNuke Evoq has done a good job towards bridging that gap. Both these frameworks are fast enough, but since WordPress uses PHP and MYSQL it is slightly faster. Furthermore, WordPress is an ideal platform specific for blogging. This means that many developers do not even consider it a real CMS. WordPress has introduced few upgrades and changes over the years, while DNN works hard to introducing some interesting upgrades with every new version.

In conclusion, if you had to make a choice, hiring a DNN developer should be your first one unless you intend to create a site that is purely content, SEO centric containing blogs.

DNN versus Joomla

The choice between DNN and Joomla is slightly more complex. Joomla continues to show improvements as a CMS, but as soon as it started gaining acceptance, Magento came in and stole all the attention. One of the bigger problems with this framework is that it does not work very well with Windows, especially when compared to DNN. Joomla administration functions are more complex than that of DotNetNuke. This means new DNN developers take lesser time to get used to the administration as compared to the Joomla counterparts.

Joomla is also week with respect to security, especially with groupings. You will need to use some 3rd party modules to solve this problem.

DNN versus Drupal

When comparing these two CMS systems, it has been often concluded that DNN works better in Internet Explorer. On the hand, if you wish to gain better performance on FireFox, Drupal should be your choice. Drupal is written in PHP, and isn't as popular as other CMS systems available. As a matter of fact, only about 2% of the websites on the Internet use this framework. This framework is primarily used by personal blogs and government websites. DNN is definitely the preferred choice if you wish to create a website that is scalable.

Before you close on a CMS framework make sure you speak with your DotNetNuke developers understand the scope of your website and how this framework will help you achieve your internet objectives.

Best Recommended DotNetNuke Hosting

ASPHostPortal.com is the leading provider of Windows hosting and affordable DotNetNuke Hosting. DotNetNuke Hosting from ASPHostPortal.com provides a safe, reliable and performance-driven foundation for your DotNetNuke website. DotNetNuke is the perfect Content Management System for managing and developing your website with one of ASPHostPortal’s Hosting plans. ASPHostPortal has ability to support the latest Microsoft and ASP.NET technology, such as: WebMatrix, WebDeploy, Visual Studio 2015, .NET 5/ASP.NET 4.5.2, ASP.NET MVC 6.0/5.2, Silverlight 6 and Visual Studio Lightswitch, ASPHostPortal guarantees the highest quality product, top security, and unshakeable reliability, carefully chose high-quality servers, networking, and infrastructure equipment to ensure the utmost reliability.


DotnetNuke Hosting - ASPHostPortal.com :: How To Setting DNN Environment

clock Oktober 20, 2016 11:59 by author Armend

To develop modules for DotNetNuke you must first have a DotNetNuke installation running on the computer on which you intend to develop them. Setting up your development environment can vary based on what your end goal is. If you are doing module development for your own use, and within your own DNN environments, you can ignore a few of the settings below. If you are doing module development with the idea that you might turn around and give the modules away, or sell them, then you will likely want to follow the guidelines set forth below to support the widest array of DNN installation environments.

I recommend that each developer have their own local development environment, with a local IIS website running DotNetNuke, and a SQL Server 2008/2012 (not express, though you can use it) database for the website. Having an individual development environment makes group module development far easier than if you share environments/databases.

The steps for setting up your development environment will apply to both the Community and Professional editions of DotNetNuke.

Installation Configuration

Once you have the version selection out of the way you can go through the installation process. While I’m not going to walk you through the minutest of details of each step of installing DotNetNuke in this post, I will at least try to point you in the right direction for each step. Download the INSTALL package of the version of DotNetNuke you want to use in your development environment. Extract the files in the INSTALL package to a location of your choosing, this location is where you will point IIS (the web server) when we can configure the website. In my environment I typically use c:\web\dnnme.com\ (One item of note: you may need to right click on the ZIP file and choose Properties before extracting, on the properties window if you have an UNBLOCK option, click that. Some versions of Windows have started blocking files within the DotNetNuke ZIP files, which will cause you problems later during the actual install.)


Setup IIS

IIS is the web server that comes with Windows computers. DNN 7 requires IIS 7 or later (7,7.5,8.0), so you will need at least Windows Vista, Windows 7, Windows 8, or Windows Server 2008 R2, Windows Server 2012. In IIS you should create a new website (Note: If you use an existing website in IIS be sure to add the HOST binding for DNNME.COM), and point to the folder where you extracted the INSTALL package.

Note: With DotNetNuke 7.0+, .NET Framework 4.0 is required, so be sure that your application pool is configured to run under 4.0, and not 2.0.
Set File Permissions

Setting up the file permissions for your DNN install is often the step that causes the most trouble. You should right click on the FOLDER in which you extracted DNN (c:\web\dnnme.com\) and choose properties. Choose the Security tab. You need to add permissions for the account in which your website's application pool is running under. You will want to setup the permissions to give the account Full or Modify permissions for the DNNME.COM folder. Which account you will use will vary based on your version of IIS, here’s a simple list of some of the default accounts based on the version of IIS.

  • IIS Version Operating System Account
  • IIS 7 Windows Vista, Windows Server 2008 localmachine\Network Service
  • IIS 7.5 Windows 2008 R2, Windows 7 IIS AppPool\APPPOOLNAME
  • IIS 8 Windows 2012, Windows 8 IIS AppPool\APPPOOLNAME

Note: If you are using IIS7.5/8.0 you’ll notice in the above table that we have APPPOOLNAME in the identity, this is because when you setup a new website in IIS a new application pool is created. In place of you should type in the name of the application pool that was created. You can also bypass this and configure your application pool to use the Network Service account instead of a dynamic account if you would like.

Database Configuration

In SQL Server you should go through and create a new database. I always create a database with the same name as the website, so in this case DNNME.COM. Once you have created the database, create a user that can access that database. I always use SQL authentication, turn off the enforce password requirements, and give the user DB Owner and Public access to the DNNME.COM database. Remember the username and password you create here as you will need them when you walk through the Installation screen for DotNetNuke.

DotNetNuke Installation Screen

Populate the installation screen with the standard DNN information, Host username, password, etc. For the Database option, choose Custom and configure your database connection, providing the Server IP/Name, the Database name (dnndev.me). For the database authentication you'll want to choose the option that allows you to enter the username/password for the database user that you created previously.
Now there are two additional options you can configure, normally I would tell you not to modify these, but from a development environment perspective I do recommend that you change the objectQualifier setting. It should be blank by default, you should type in “dnn” (without quotes), this will prepend “dnn_” to all of the objects that get created by DNN such as Tables and Stored Procedures. This is not something I recommend from a production stand point, but if you are developing modules for sale, then supporting objectQualifier in your development is recommended. It will save you time down the road if you have a customer who has an objectQualifier defined on their production databases.

Best Recommended DotNetNuke Hosting

ASPHostPortal.com is the leading provider of Windows hosting and affordable DotNetNuke Hosting. DotNetNuke Hosting from ASPHostPortal.com provides a safe, reliable and performance-driven foundation for your DotNetNuke website. DotNetNuke is the perfect Content Management System for managing and developing your website with one of ASPHostPortal’s Hosting plans. ASPHostPortal has ability to support the latest Microsoft and ASP.NET technology, such as: WebMatrix, WebDeploy, Visual Studio 2015, .NET 5/ASP.NET 4.5.2, ASP.NET MVC 6.0/5.2, Silverlight 6 and Visual Studio Lightswitch, ASPHostPortal guarantees the highest quality product, top security, and unshakeable reliability, carefully chose high-quality servers, networking, and infrastructure equipment to ensure the utmost reliability.


DotNetNuke Hosting - ASPHostPortal.com :: How to create a simple skin in DNN?

clock Oktober 13, 2016 21:33 by author Armend

How to create a simple skin in DNN?

So how does the skin template works in DNN? DNN supports multiple template or skins. Each individual page can have their own skin template or set pre-default skin. The DNN skins are located under portals folder. There are two folders name available, one is _default folder name and the other one is 0 folder name. The _default folder represent the shared folders that can be accessed by all portals. While the 0 portal name is exclusively can be used by a specific portal only which is in this case is the portal that has a portal ID equals to 0. The following screenshot of the DNN structure folder below is viewed using Visual Studio
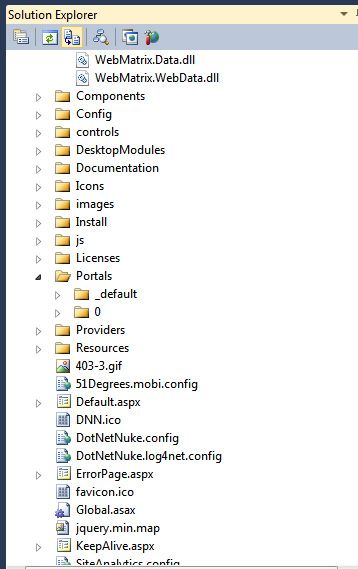
We start the example of skinning by creating a really simple template in html. We will have the following example template structures consist of a navigation, content body and a footer.
This will be the sample of the html code.

<!DOCTYPE html>
<html lang="en">
<head></head>
<body>
    <style>
        html, body,form{
            margin:0;
            padding:0;
            height:100%;
            font-family:Arial;
        }
       
        #container{
            margin:0 auto;
            text-align:left;
            min-height: 100%;
            height: auto !important;
            height: 100%;
            margin-bottom:-50px;
        }
       
        nav{
            background:#000;
            height:50px;
            line-height:50px;
            margin-bottom:10px;
        }
       
        nav ul, nav ul li{
            margin:0;
            padding:0;
            list-style:none;
        }
       
        nav ul li{
            float:left;
            margin:0 10px;
        }
       
        nav ul li a{
            color:#fff;
            text-decoration:none;
            text-transform:uppercase;
        }
       
        #left-column{
            float:left;
            width:23%;
            margin-left:2%;
        }
       
        #right-column{
            float:right;
            width:70%;
            margin-right:2%;
        }
       
        .clear-footer{
            height:50px;
            clear:both;
        }
       
        footer{
            height:50px;
            line-height:50px;
            background:#000;
            color:#fff;
            text-align:center;
        }
    </style>
    <div id="container">
        <nav>
            <ul>
                <li><a href="#">Home</a></li>
                <li><a href="#">Products</a></li>
                <li><a href="#">About Us</a></li>
                <li><a href="#">Contact Us</a></li>
            </ul>
        </nav>
        <div id="body-content">
            <div id="left-column">
                left content goes here...
            </div>
            <div id="right-column">
                right content goes here...
            </div>
        </div>
        <div class="clear-footer"></div>
    </div>
    <footer>
        Copyright mysite
    </footer>
</body>
</html>

We create the simple skin template in the Portal 0 folder. This is the correct place to create your first skin DNN. If have to share your skin for multiple websites, you can place the skin template into the _default folder instead
To help you save time, we can just copy the sample skin template from the _default folder. In this example, we copy the template name from Gravity folder. What we need are the skin.css, 2-col.ascx, simple folder which is the contains navigation script and image preview for 2-col.jpg, this is optional. If you do not want to offer any preview image, you can omit this one.
Let's open the 2-col.ascx file and modify the html according to our skin. One of the most important thing you need to understand is, the DNN skin always required a server tag named ContentPane and if you do not have this, it will result an error when you try to load this screen. Basically you need this code sitting somewhere in your skin template. The ContentPane text is not case sensitive so it can be lowercase if you want.

<div id="ContentPane" runat="server"></div>

Here is the new template based on the html skin template we create. We remove all html tags that are not used based on our skin template.

<%@ Control language="vb" AutoEventWireup="false" Explicit="True" Inherits="DotNetNuke.UI.Skins.Skin" %>
<%@ Register TagPrefix="dnn" TagName="LANGUAGE" Src="~/Admin/Skins/Language.ascx" %>
<%@ Register TagPrefix="dnn" TagName="LOGO" Src="~/Admin/Skins/Logo.ascx" %>
<%@ Register TagPrefix="dnn" TagName="SEARCH" Src="~/Admin/Skins/Search.ascx" %>
<%@ Register TagPrefix="dnn" TagName="BREADCRUMB" Src="~/Admin/Skins/BreadCrumb.ascx" %>
<%@ Register TagPrefix="dnn" TagName="USER" Src="~/Admin/Skins/User.ascx" %>
<%@ Register TagPrefix="dnn" TagName="LOGIN" Src="~/Admin/Skins/Login.ascx" %>
<%@ Register TagPrefix="dnn" TagName="PRIVACY" Src="~/Admin/Skins/Privacy.ascx" %>
<%@ Register TagPrefix="dnn" TagName="TERMS" Src="~/Admin/Skins/Terms.ascx" %>
<%@ Register TagPrefix="dnn" TagName="COPYRIGHT" Src="~/Admin/Skins/Copyright.ascx" %>
<%@ Register TagPrefix="dnn" TagName="LINKTOMOBILE" Src="~/Admin/Skins/LinkToMobileSite.ascx" %>
<%@ Register TagPrefix="dnn" TagName="MENU" src="~/DesktopModules/DDRMenu/Menu.ascx" %>
<div id="container">
    <dnn:MENU MenuStyle="Simple" runat="server"></dnn:MENU>
    <div id="body-content">
        <div id="left-column">
            <div id="leftpane" runat="server"></div>
        </div>
        <div id="right-column">
            <div id="contentpane" runat="server"></div>
        </div>
    </div>
    <div class="clear-footer"></div>
</div>
<footer>
    <dnn:COPYRIGHT ID="dnnCopyright" runat="server" />
</footer>

In order for DNN to understand where to place the module you will need to create a html tag as server control. Usually it is a div tag, but it is not limited to this, it can be td row or span if you prefer. For example, we have two columns in our skin template. One is for the left content and the other one is for the right content. As we place contentpane in the right content, we need another server control to be placed in the left content. Therefore in this case we create the server pane named leftpane. The DNN will now recognize there are two panes available for the system to insert the module

The next part is to modify the navigation template file, let's open the SimpleTokens.txt file. We need to match it accordingly to our html navigation. You can leave the script for the navigation as it is. So the only changes are the couple top lines code.

<nav>
<ul>
[*>NODE]
</ul>

The last step is to copy our style into the skin.css file. Simple open the skin.css file and copy and paste the style from our html. Just to let you know by default each template will use the style called skin.css, so this is a required file. Once everything has already been completed, we can create a simple page and start set the page use our first skin template

Best Recommended DotNetNuke Hosting

ASPHostPortal.com is the leading provider of Windows hosting and affordable DotNetNuke Hosting. DotNetNuke Hosting from ASPHostPortal.com provides a safe, reliable and performance-driven foundation for your DotNetNuke website. DotNetNuke is the perfect Content Management System for managing and developing your website with one of ASPHostPortal’s Hosting plans. ASPHostPortal has ability to support the latest Microsoft and ASP.NET technology, such as: WebMatrix, WebDeploy, Visual Studio 2015, .NET 5/ASP.NET 4.5.2, ASP.NET MVC 6.0/5.2, Silverlight 6 and Visual Studio Lightswitch, ASPHostPortal guarantees the highest quality product, top security, and unshakeable reliability, carefully chose high-quality servers, networking, and infrastructure equipment to ensure the utmost reliability.


DotNetNuke Hosting - ASPHostPortal.com :: SEO Dos And Don'ts For DotNetNuke

clock Oktober 9, 2016 06:58 by author Dan

DotNetNuke is easily one of the most popular ASP.Net content management (CMS) systems out there. In this post I am going to cover some of the simplest, fastest things you can do to your DotNetNuke site in order to improve SEO. If your first question was "What is SEO?" then this post is for you. If you are familiar with SEO and want a quick refresher that pertains specifically to DotNetNuke then this post is for you. If you have already carefully tuned your site and are looking for advanced optimization techniques, go hire a marketing professional with a proven track record of SEO success.

So, what is SEO? The term SEO stands for Search Engine Optimization and it essentially means tweaking your site to make it more search-friendly. A search-friendly site makes it much easier for your current and potential customers to locate your site and to find what they need on your site. The end-goal of SEO is often more specifically about getting into one of the coveted top spots in Google's search results for a particular term or phrase. While achieving that goal usually takes a lot more than the simple tips presented in this post (for example, Google's ranking depends a lot on the number and types of other sites that link to you), these tips will get you started on the right path and will make your site more useful and usable in the process.

DO use a DotNetNuke (DNN) skin that is web standards-based and follows current recommended practices for accessible content. A good skin will probably note that it is XHTML or HTML5 compliant and may display a small W3C icon indicating that its code validates properly. The W3C is the internationally-recognized body responsible for setting standards that govern key web technologies. A good skin will not use tables for layout. You may also see references to Section 508, which refers to standards set forth in US law for make a site accessible to all users including those using screen readers and other assistive technology. Section 508-compliant sites tend to also be extremely search-friendly as they will include additional text and meta-data to serve assistive technology that is also useful to the robots used by Google, Bing, Yahoo and others.

DON'T make any key text into an image. In fact, avoid making any text into an image at all. Search engines cannot read any text from an image, and neither can screen readers for visually-impaired users. Web font services such as Typekit, Webtype and Google Web Fonts make it easier than ever to replace images with plain text and maintain custom styling. If you must use an image for text, make sure that you properly define the alt tag of the image. This is something that is absolutely essential to do for all images on your site, not just those that contain text. In DotNetNuke you typically set up this text in the properties area when inserting an image. You can also configure an additional long description through this dialog where appropriate.

DO take advantage of the site-wide and page-level descriptions and keywords available in DNN. Most themes will use these elements in the header meta-tags of your site. While search engines never rely on keyword tags alone for indexing, these keywords can be useful for pointing out to the search engine which words on the page are particularly important. On the other hand, the description is typically used by search engines as the snippet that will be displayed in their search results. For this reason you should keep it short, to-the-point and self-explanatory. This is your chance to grab the attention of someone who is quickly scanning a search results page for relevant links. The site-wide description will often be used when no page-level description is present but you should always override it with a more specific description per page when possible to prevent the appearance of duplicate content and to give a better idea of what is actually on each page. You can set the description and keywords for the entire site in Site Settings and for an individual page while editing that page.

DON'T post misleading content, duplicate content on multiple pages or rip content from other sites on the web. Google in particular is known to penalize this type of behavior. This should be an obvious one as it is also clearly an ethical issue. The best way to attract the customers that are right for you is to post authentic, original content that benefits them in some way. If you find an article elsewhere that you think may be beneficial to your customers the best thing to do is to write your own post adding value to the discussion, including one or two short, properly-attributed quotes and linking to the full text on the original site. Who knows, this neighborly behavior could even lead to a productive relationship with the author of the content and perhaps a link back to your site from theirs at some future date.

DO update frequently, write plenty of informative text and try to include the words and phrases that you think customers will use when trying to search for the content you have written. Pay attention to the types of questions your customers are asking and how they are asking them. Try to think like a customer when writing and use the same terms that they would be likely to use when searching. Mention those things which are most distinguishing about you and that you want others to find out about you. By doing this not only will you make your content rank higher in search results but you will also make it far more relevant to your customers themselves. It is also a very good idea to include the keywords you identify in the titles of your pages or posts whenever it makes sense to do so - search engines tend to place special emphasis on URLs and titles.

DON'T rename or move pages unless absolutely necessary (and even then seriously consider creating a redirect from the old location to the new one). I should really say don't rename or move pages ever. Changing the structure of your site can cause dead links both internally and externally. If someone has bookmarked a particular location or linked to it from a blog, web site or tweet and you move or rename that page the link will stop working and you will end up with missed opportunities and frustrated and alienated customers. Restructuring your site can also lead to a (usually temporary) search ranking penalty until your site is re-indexed by every major search provider. If you must move a page you can create a placeholder at the old location and use the DNN link/redirect options to make sure that people with only the old URL will still end up in the right place.

DO use the semantic nature of HTML to add value to your content. An < h1 > (Heading 1) tag should be the most important heading on your page. < h2 > should be next and so forth, like an outline. The < p > should separate paragraphs. Addresses should be indicated with < address > and lists with < ul > (unordered) or < ol > (ordered). Links created with the < a > tag should include title attributes. Like many of the previous tips, producing well structured content helps both search engines and assistive devices parse your site with greater success. It also starts you down the path towards microformats and some of the advanced and exciting things being done with them. DNN makes at least the basics of this relatively easy without editing the actual code. You can simply choose the tag that will be used from the built in editor. When you do this, just remember that you are describing the text as well as styling it.

Best Recommended DotNetNuke Hosting

ASPHostPortal.com is the leading provider of Windows hosting and affordable DotNetNuke Hosting. DotNetNuke Hosting from ASPHostPortal.com provides a safe, reliable and performance-driven foundation for your DotNetNuke website. DotNetNuke is the perfect Content Management System for managing and developing your website with one of ASPHostPortal’s Hosting plans. ASPHostPortal has ability to support the latest Microsoft and ASP.NET technology, such as: WebMatrix, WebDeploy, Visual Studio 2015, .NET 5/ASP.NET 4.5.2, ASP.NET MVC 6.0/5.2, Silverlight 6 and Visual Studio Lightswitch, ASPHostPortal guarantees the highest quality product, top security, and unshakeable reliability, carefully chose high-quality servers, networking, and infrastructure equipment to ensure the utmost reliability.


DotNetNuke Hosting - ASPHostPortal.com :: How to Edit the Privacy Statement on Your DotNetNuke Site

clock Oktober 6, 2016 20:32 by author Armend

How to Edit the Privacy Statement on Your DotNetNuke Site

You will eventually find the need to edit your DotNetNuke privacy statement.  Whether it is to add statements for COPPA compliance, DART cookies, third party vendors , or a number of other situations, the default statement just does not include everything you need.

The first time I decided to edit this statement, finding it was no small task.  Therefore, I thought I would lay out an easy to follow tutorial which, hopefully will be useful to you, and one which I can refer back on the next time I need to edit my own. This example is from DotNetNuke version 6.2.1, but the procedure is not so different in other versions.
The Terms of Use statement is stored in Global Resources for the site.  The easiest way to edit these resources is to login as an administrator and navigate to the “admin” panel.   Once there, select the “Languages” icon.

Click the “Manage” button near the “Language Management” text.  Click “Settings”.  Scroll down, if necessary and you will see a localized content section which will list the languages installed for the site.  In the “Static Resources” section to the right, find the column labeled “site” and click the “edit” icon

The “Language Editor” screen opens.   In the top left corner, you will see a treeview with “Local Resources” and “Global Resources”.   Verify that the “Select Mode” radio button is set to “Site”.  Open “Global Resources”, and select “Global Resources” again in the dropdown.

Scroll down the list until you find “ResourceName:MESSAGE_PORTAL_PRIVACY.text”.
Click the “edit” icon.


An editor window will open with the contents of your “Privacy” statement for the website.  Edit as you desire then save it. 
One further note, using the variable [Portal:PortalName] in your statement will insert the name of your portal into the displayed text. [Portal:Email] will insert the default email address of the portal.
Task complete !

Best Recommended DotNetNuke Hosting

ASPHostPortal.com is the leading provider of Windows hosting and affordable DotNetNuke Hosting. DotNetNuke Hosting from ASPHostPortal.com provides a safe, reliable and performance-driven foundation for your DotNetNuke website. DotNetNuke is the perfect Content Management System for managing and developing your website with one of ASPHostPortal’s Hosting plans. ASPHostPortal has ability to support the latest Microsoft and ASP.NET technology, such as: WebMatrix, WebDeploy, Visual Studio 2015, .NET 5/ASP.NET 4.5.2, ASP.NET MVC 6.0/5.2, Silverlight 6 and Visual Studio Lightswitch, ASPHostPortal guarantees the highest quality product, top security, and unshakeable reliability, carefully chose high-quality servers, networking, and infrastructure equipment to ensure the utmost reliability.


About ASPHostPortal.com

We’re a company that works differently to most. Value is what we output and help our customers achieve, not how much money we put in the bank. It’s not because we are altruistic. It’s based on an even simpler principle. "Do good things, and good things will come to you".

Success for us is something that is continually experienced, not something that is reached. For us it is all about the experience – more than the journey. Life is a continual experience. We see the Internet as being an incredible amplifier to the experience of life for all of us. It can help humanity come together to explode in knowledge exploration and discussion. It is continual enlightenment of new ideas, experiences, and passions

Author Link


 photo ahp banner aspnet-01_zps87l92lcl.png

Corporate Address (Location)

ASPHostPortal
170 W 56th Street, Suite 121
New York, NY 10019
United States

Tag cloud

Sign in