
Mei 5, 2014 13:03 by
 Kenny
Kenny-- Highly affordable Windows Cloud Server, Provisioned in just 5-10 minutes Start from $18.00/month! --

ASPHostPortal.com, a leading Windows web hosting provider, proudly announces the most affordable Windows Dedicated Cloud Server. With Windows Dedicated Cloud Server Services from ASPHostPortal.com, you’ll find the perfect Cloud Server solution for your business. Web pages will load faster for ecommerce customers, databases will get higher IOPS and applications streaming large volumes of video and media files will experience low latency when customers run their applications. With cloud servers, you have the ability to upgrade and downgrade your servers on the fly. In some cases depending on the Operating System running on the cloud server it may still require a reboot. Migrating your cloud server to a different physical server can usually be accomplished with no downtime via hot migration.
ASPHostPortal.com offer Windows Dedicated Cloud Server with the following features:
- Windows 2008R2/2012
- Data Center OS Version
- 1 x vCPU
- 1 GB RAM
- 40 GB Storage (SSD)
- 1000 GB Bandwidth
- 1000 Mbps Connection
- 1 Static IP
- SAN Storage
"An scalable and flexible cloud servers account costs $18.00 per month and gives you 40 GB Storage (SSD), SSD might make the server boot faster, it is now up to 100 times faster than a hard drive" said Dean Thomas, Manager at ASPHostPortal.com.
Cloud hosting systems are run on systems with very powerful processors with SAN Storage which is typically faster for most applications. A storage area network can be easier to manage than other storage systems. By consolidating information into one easily accessible place, it becomes easier to access information while also making it simple to increase capacity as and when required.
Windows Cloud server probably holds the best stability / cost ratio performance. They do not suffer from the usual server hardware problems and they have all Cloud computing, benefits, i.e. they are stable, fast and secure.
Where to look for the best Windows cloud server service? How to know more about the different types of hosting services? Read more about it on http://www.asphostportal.com.
About ASPHostPortal.com:
 ASPHostPortal.com is a hosting company that best support in Windows and ASP.NET-based hosting. Services include shared hosting, reseller hosting, and SharePoint hosting, with specialty in ASP.NET, SQL Server, and architecting highly scalable solutions. As a leading small to mid-sized business web hosting provider, ASPHostPortal.com strive to offer the most technologically advanced hosting solutions available to all customers across the world. Security, reliability, and performance are at the core of hosting operations to ensure each site and/or application hosted is highly secured and performs at optimum level.
April 30, 2014 07:05 by
Kenny
DotNetNuke is a web content management system based on Microsoft .NET. The Community Edition is open source. DotNetNuke was written in VB.NET, though the developer has shifted to C# since version 6.0. It is distributed under both a Community Edition MIT license and commercial proprietary licenses as the Professional and Enterprise Editions.

In this article, I will explai n about how to allow large file uploads in DotNetNuke. Usually we come across the requests to set larger file uploads for the editor in DotNetNuke. The default setting allows you to upload 4mb which if you want to upload media files is not enough. Here are the changes required to upload larger files via editor and file manager in DotnetNuke.
The example is based on using the TelerikEditorProvider set as the default html editor for the site and is based on DNN 7.0
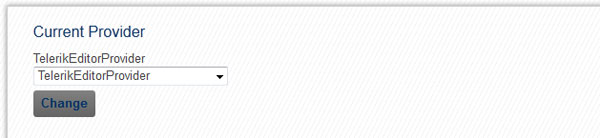
1. First, you must set the TelerikEditorProvider as the default editor for the site.
Under host HTML Editor Manager you can see the current provider and change it if required to TelerikEditorProvider
2. Set the default upload size for the file managers
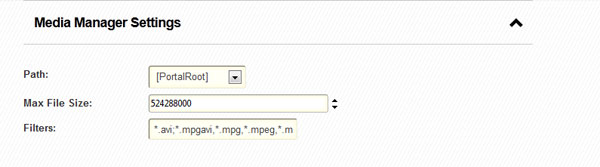
By clicking on everyone under Default Configuration you can access the editor settings. In the editor configuration tab you can allow additional file extensions (make sure they are set as allowed under host settings as well) and set the file upload size for all types of file managers.
The values are in bytes so for example 524288000 = 500mb.
Here are the settings for the Media Manager.
3. Change the ConfigDefault.xml values
If after this you still can see only 4mb as allowed file size in the editor you will have to digg in a bit deeper. Download (make sure you make the backup) ConfigDefault.xml from /Providers/HtmlEditorProviders/Telerik/Config/
Change the required manager properties
<property name="MediaManager.MaxUploadFileSize">4194304</property>
for 500mb upload change to
<property name="MediaManager.MaxUploadFileSize">524288000</property>
The values are in bytes 524288000 = 500mb
Save an upload to /Providers/HtmlEditorProviders/Telerik/Config/ overwiting the current file.
4. Changes in the web.config file
Make sure you make the back up and then find the following code
<!-- Forms or Windows authentication -->
<authentication mode="Forms">
<forms name=".DOTNETNUKE" protection="All" timeout="60" cookieless="UseCookies" />
</authentication>
<!--
<identity impersonate="true"/>
<authentication mode="Windows">
</authentication>
-->
<!-- allow large file uploads -->
<httpRuntime useFullyQualifiedRedirectUrl="true" maxRequestLength="8192" requestLengthDiskThreshold="8192" />
First change
<forms name=".DOTNETNUKE" protection="All" timeout="60" cookieless="UseCookies" />
to
<forms name=".DOTNETNUKE" protection="All" timeout="9000" cookieless="UseCookies" />
This will prevent the timeout during upload, the value is in seconds.
After that change
<httpRuntime useFullyQualifiedRedirectUrl="true" maxRequestLength="8192" requestLengthDiskThreshold="8192" />
to
<httpRuntime useFullyQualifiedRedirectUrl="true" maxRequestLength="512000" requestLengthDiskThreshold="512000" />
This value is in kilobytes 512000 = 500mb
In some cases this should be all, however if you receive I/O error during upload there is another line of code you need to add in web.config
in
<configuration>
<system.web> section.
<configuration>
...
<system.web>
<httpRuntime maxRequestLength="512000" executionTimeout="9000" />
...
</system.web>
</configuration>
The maxRequestLength value is in kilobytes 512000 = 500mb
5. Changes in IIS7
Sometimes in IIS7 and if you have access to the server you may need to check that the overrideModeDefault property is set to to "Allow" in C:\Windows\System32inetsrv\config\applicationHost.config
<section name="requestFiltering" overrideModeDefault="Allow" />
Following these steps you should be able to set the file upload limits up to 2GB.
April 2, 2014 09:56 by
Kenny
Good news, no you can adapt DotNetNuke portal to mobile devices without changing your existing desktop experience. The latest trend in web development is exciting to say the least - with increasing in Mobile device penetration around the globe. Mobile devices already have displaced many of the fixed-location technologies especially in rural in developed world or countries like India Brazil and China that are currently filling the global economic growth. MobiNuke is exposing a rich set of mobile device capabilities available to be used by module or skin developers.
Main Features
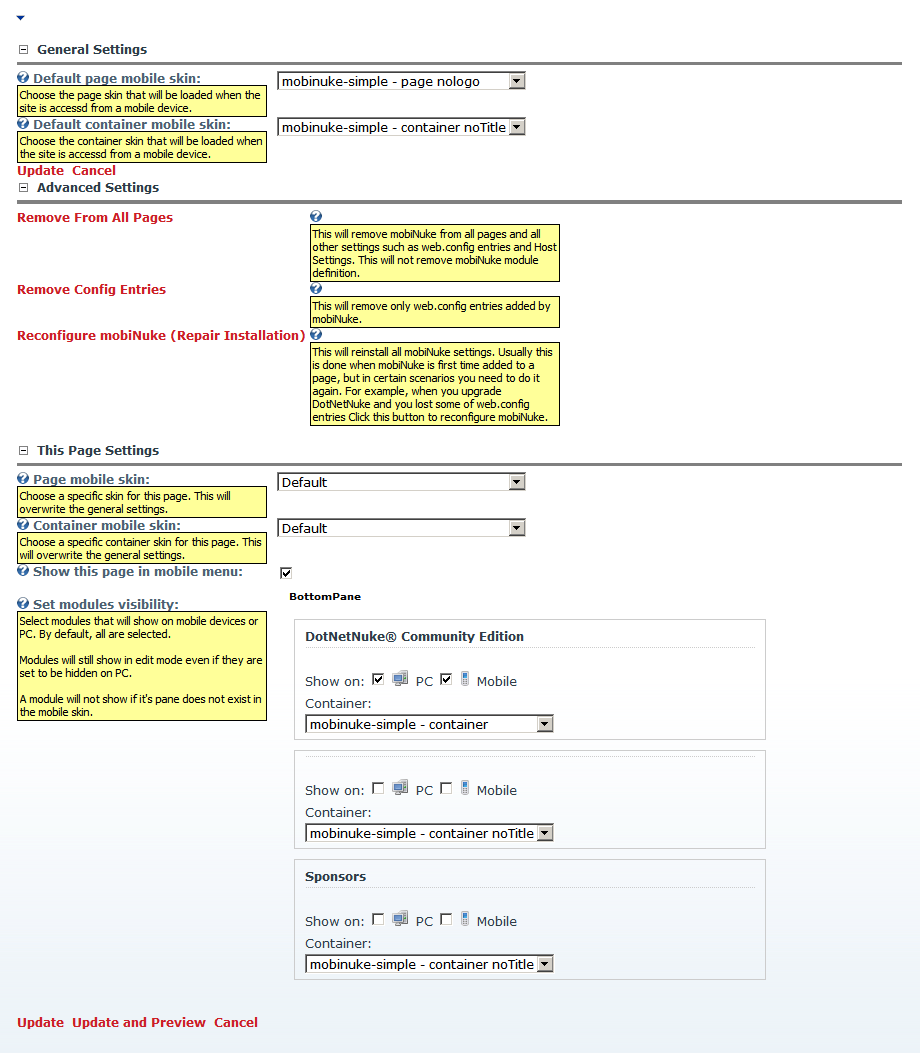
- You will apply separate skins for mobile experience.
It can be when you want to set different skins that will be applied when pages are accessed from mobile devices. Don’t worry it will not change the skin for your desktop browsers. And now skin designers can develop mobile friendly skin sets together with desktop skins.
- Mobile devices access the portal through a lighter page.
It will be fast, because anything that is not needed by a mobile device is cleaned out. The content type and MIME type are set to specific values for mobile browsers.
- It’s up to you for enable or disable any existing modules for mobile context or for PC.
You can set some modules to show only on PC and others only on mobile devices. You can do different set up for each page.
- Support for mobile versions of existing modules.
Developers can extend their modules for mobile context.
- Expose mobile device capabilities.
Developers can get properties such as device type, screen dimensions, if JavaScript or online video is supported and more than 500 other mobile device properties.
How to Make it Work
- Download and install MobiNuke through Host->Module Definitions-> Install New Module.
- Add mobiNuke to any page. It will add itself to all the pages and will act as an extra setting.
- Click on Mobile Settings to configure general settings and page specific settings for mobile access.
Technical Details
MobiNuke contains 5 components:
- A httpModule that redirects request coming from a mobile device to DefaultMobi.aspx
- A DotNetNuke Module with the following functions:
- When added for the first time it will auto-configure itself to be present on all pages;
- Manage the skin to be loaded when the page is accessed from a mobile device;
- Preview the page close to the way it looks on a mobile device;
- Enable or disable tab modules for mobile pages;
- A DefaultMobi.aspx page for mobile context that has the same function as Default.aspx. Anything that is not usable on mobile devices is cleaned out.
- A set of minimal skins suitable for mobile browsing. Currently the mobile skin contains only the ContentPane. It only shows the corresponding modules from the ContentPane of the desktop skin.
- A mobile friendly navigation provider.
Maart 19, 2014 08:42 by
KennyBootstrap is a free collection of tools for creating websites and web applications. It contains HTML and CSS-based design templates for typography, forms, buttons, navigation and other interface components, as well as optional JavaScript extensions.

Twitter's Bootstrap is an excellent set of carefully crafted user interface elements, layouts, and javascript tools, freely available to use in your next web design project. This video series aims to introduce you to Bootstrap; taking you all the way from downloading the resources, to building a complete Bootstrap-based website.
While in the process of developing our own Responsive Twitter Bootstrap Skin for DotNetNuke 7, we had to jump over a couple of hurdles. First we had to figure out how to implement a dropdown on hover menu. Secondly, we had to overcome the Bootstrap issue where once you are on a child page, you cannot navigate back to the parent page in the menu. Bootstrap is against both of these features, however we feel as though these features provide a user friendly interface, especially while using a tablet or smartphone. With that said, we wrote this article to save you the headache to incorporate these two features in your Responsive Twitter Bootstrap Skin for DotNetNuke 7.

The real beauty was that I realized, I had included both the data-toggle="dropdown" and the data-hover="dropdown". You must only use the data-hover="dropdown" to fix both issues! The correct code is below:

Now you will have dropdown on hover menu items AND will be able to navigate to the parent page from the child page.
Maart 19, 2014 08:42 by
Kenny
Bootstrap is a free collection of tools for creating websites and web applications. It contains HTML and CSS-based design templates for typography, forms, buttons, navigation and other interface components, as well as optional JavaScript extensions.
Twitter's Bootstrap is an excellent set of carefully crafted user interface elements, layouts, and javascript tools, freely available to use in your next web design project. This video series aims to introduce you to Bootstrap; taking you all the way from downloading the resources, to building a complete Bootstrap-based website.
While in the process of developing our own Responsive Twitter Bootstrap Skin for DotNetNuke 7, we had to jump over a couple of hurdles. First we had to figure out how to implement a dropdown on hover menu. Secondly, we had to overcome the Bootstrap issue where once you are on a child page, you cannot navigate back to the parent page in the menu. Bootstrap is against both of these features, however we feel as though these features provide a user friendly interface, especially while using a tablet or smartphone. With that said, we wrote this article to save you the headache to incorporate these two features in your Responsive Twitter Bootstrap Skin for DotNetNuke 7.
The real beauty was that I realized, I had included both the data-toggle="dropdown" and the data-hover="dropdown". You must only use the data-hover="dropdown" to fix both issues! The correct code is below:
Now you will have dropdown on hover menu items AND will be able to navigate to the parent page from the child page.
Maart 13, 2014 12:50 by
KennyIn this article, i'm going to explain how about you can convert .html file into a master page.
SharePoint 2013 offers a simplified user experience and added enterprise social media capabilities, which expand upon previously offered capabilities for website management that include shared calendars, blogs, wikis, surveys, document libraries and shared task lists. You can convert .html file into a Master Page using Design Manager in SharePoint 2013, you can convert .html file into a Master Page. After completion of the conversion process both HTML and Master Pages are get associated with each other, so when you change the HTML file and save, the changes are synced to the associated Master Page. If you use Design Manager in SharePoint 2013 then you do not have to know about SharePoint specific mark-up or ASP.NET. As a designer you can concentrate on CSS, HTML and JavaScript.

Remember that the synchronization process works in one direction only, any changes to the HTML page are synced to the master page but If you change the master page then those changes would not reflect in HTML page. Every HTML master page has a property Associated File which is set to true by default.
Now we will start to convert HTML page into Master Page
Before converting HTML page, you have to upload all your design files to mapped drive. Map a network drive to Master Page gallery navigate to the design manager using site settings
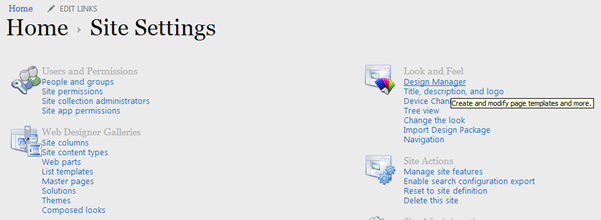
In Design Manager , click the fourth link Edit Master Pages
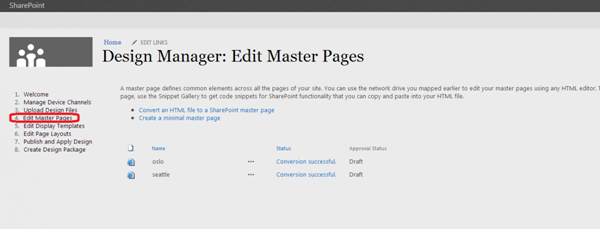
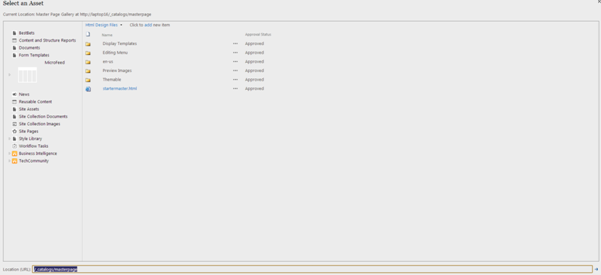
Then click the convert HTML file to a SharePoint Master page link , In Select an Asset dialogue box browse the design files that you want to convert.
Februarie 24, 2014 06:04 by
KennyDotNetNuke is a program that runs on Microsoft ASP.NET. It is also a framework, meaning, it is a program that is designed to be extended. One of the ways you extend the framework is to create modules. These modules are installed inside a DotNetNuke installation and when they run in that DotNetNuke installation they extend the framework to create a DotNetNuke website also called a portal.
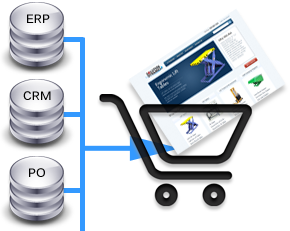
In this article I will tell you about “How to Building an Ecommerce in DotNetNuke Module”

For the first, you will need to open the DotNetNuke website development copy in your Visual Studio. Then simply add a plain file to your eCommerce in DotNetNuke project by making use of a DotNetNuke Dynamic Module template, which comes fully installed with your DotNetNuke Starter Kit package. Open your web.config file to trace the compilation node. Then simply proceed to add a node titled codeSubDirectories under compilation. Add one more item under the codeSubDirectories by using name of your module entered by you in the last step, in the following format: <add directoryName="ModuleName"/>.
Now, go to the Solution Explorer and proceed by locating the DesktopModules directory. Here, you will find a fresh directory that has been created by Dynamic Module template, below your DesktopModules directory. Rename the directory with the same module name used by you in your previous steps. You must next log-in into the DotNetNuke website, opened previously by you in the Visual Studio, by using the facility of a host account provided for the purpose. Under the main menu of this host account, select the Module Definitions option, and then select the Create New Module option. Now, you will need to fill-up this module form by making use of the same module name used by you in the steps followed earlier.
After that is done, click on the Add Control of the form for Create New Module. From the drop-down list, click select on the file that has been added to it by Dynamic Module template. This file represents module name that was specified in your previous steps; only with the extension:.ascx added to it. You now need to open this.ascx file in the Visual Studio. It will display both a code-behind view and design created by the module template. You can add functionality to this code-behind file as deemed suitable to your eCommerce in DotNetNuke. Visual and layout elements may also be added to your design view, if desired. Before making an attempt to create the module, it is advisable to verify DotNetNuke portal installation functionality.