DotNetNuke Hosting with ASPHostPortal.com

BLOG about DotNetNuke CMS, latest technology and Special DotNetNuke Hosting Package with ASPHostPortal.com

DotNetNuke - ASPHostPortal.com :: 10 Tips For DotNetNuke Skins for SmartPhones

clock Julie 28, 2016 20:28 by author Armend

10 Tips For DotNetNuke Skins for SmartPhones

DotnetNuke skinning is changing with the latest trends one of which is building websites for smartphones and handheld devices like iPod, iPad, Android-based smartphones and many more. In this Article I have shared 10 tips which will be extremely useful for DotnetNuke Skinning for smartphones and most handheld devices.


Tip #1

basic mobile styles
html, body {
background: #fff;
color: #000;
margin: 0;
padding: 0;
font: 12px/15px sans-serif;
}


Do not rely on support of font related styling

Tip #2

No width content, careful with floats

  • {width: auto;}
  • {float: none;}

Tip #3

Setting the viewport

Add to <head> section
<meta name=”viewport” content=“width=device-width”/>
In DNN, add to default.ascx
<script language=”javascript” type=”text/javascript” >
var script = document.createElement(“meta”);
script.name = “viewport”;
script.content = “width=device-width”;
document.getElementsByTagName(“head”).item(0).appendChild(script);
</script>

Tip #4

keep it simple

  • What are mobile visitors looking for?
  • What information do they want/need?
  • Do mobile visitors have time/interest in all of my tedious sidebar content?
  • With a barebones stylesheet, which elements are clearly superfluous?
  • Which navigational elements are absolutely necessary? Which are redundant?
  • Are there entire regions of my page that would be better off not displayed?


Display only the essential no leftpane or right pane

.leftpane, .rightpane {
display: none;
}

Tip #5

top navigation (vertical)
.mi, .mi .txt {display:block !important; text-align:left; margin:0 !important;}

Tip #6

Control image width

#content img {max-width: 250px;}
or
img {max-width: 250px;}

Tip #7

Slim headings
h1, h2, h3, h4, h5, h6 {font-weight: normal;}

Tip #8

links
Highlight links


a:link, a:visited {
text-decoration: underline;
color: #0000CC;
}
a:hover, a:active {
text-decoration: underline;
color: #660066;
}
Use the tel: de facto standard
<a href=“tel:+1999999999“>Call us!</a>
Avoid target=_blank

Tip #9

Forms

  • Minimum input
  • Do not use tables for layout
  • Use definition lists (dl, dt, dd)

Tip #10

  • Keep URIs of site entry points short
    www.example.org/example.html accept example.org/example
  • careful with color contrasts
  • Use (minimum) web standards
    XHTML 1.0 / HTML 4.01 / XHTML-MP, CSS 2.1, DOM 1, ECMAScript 3
  • Always specify a doctype
  • Use standard media types
    Static: JPEG, GIF, PNG / Dynamic: 3GP, AVI, WMV, MP4

Do not use the following tags

  • × frames
  • × tables for layout
  • × nested tables
  • × image maps
  • × graphics for spacing
  • × horizontal scrolling
  • × do not rely on plug-ins, DHTML behaviors, embedded objects or script


DotNetNuke - ASPHostPortal.com :: How To installing DotNetNuke 8.0.3 using WebMatrix

clock Julie 21, 2016 20:58 by author Armend

DotNetNuke is a widely used open source CMS for building web sites and web applications on the Microsoft Web Platform. DotNetNuke is often used in conjunction with WebMatrix, a free tool that allows for the creation, customization and publication of ASP.NET web
The following tutorial will demonstrate how quick and easy it is to get your DotNetNuke application up and running!

Installing DotNetNuke

To install the DotNetNuke application from WebMatrix:

  1. Select the App Gallery option.
  2. Choose the DotNetNuke Community Edition icon. The application can be given a new name or keep the default name.
  3. Select a database.
  4. Choose SQL Server and ensure that the Windows Integrated Authentication radio button is selected.
  5. Click Next.
  6. Once prompted to install DotNetNuke, click I Accept. The DotNetNuke Installation will take a few minutes to complete. Once completed, you will receive a confirmation message.
  7. Immediately after Installing DotNetNuke, load the DotNetNuke application by clicking the OK button.

Configuring DotNetNuke

To configure DotNetNuke in WebMatrix, use the Installation Wizard to complete the following steps:

  • Click the Run button on the menu ribbon. Be sure to run the root folder of the DotNetNuke application.
  • Upon running the DotNetNuke application, there will be three options for installation:
    • Customer
    • Typical
    • Auto
  • For purposes of this article, the Typical installation will be used.
  • The Installation Wizard will perform a permissions check. Upon completion, you will be notified.
  • After the permissions check, enter your database information.
  • Once all of the database information is provided, the Installation Wizard will install the database and create the connection for you.

    Note: The installation of the database could take a few minutes to complete. Once installed, a confirmation message will be provided.

  • Once the confirmation message is received, click Next to proceed.
  • Provide your host information on the next screen.
  • Click Next.


Once the installation is complete, you will be able to log into your DotNetNuke portal.


DotNetNUke - ASPHostPortal.com ::How To Reset the Passwords for All Users in a DNN Site

clock Junie 30, 2016 20:01 by author Armend

How To Reset the Passwords for All Users in a DNN Site

Now, before I go any further, it would be an absolute best practice to have and you’d be irresponsible if you didn’t have a formal policy to protect yourself and the clients you’re providing services to.  Have a clear understanding of how you accept sites, how you maintain them, and when you destroy your copies of them.  If you’re in support, I’d suggest destroying your backups as soon as your client confirms that their issue is solved.  The rule of thumb here, don’t keep copies.  Destroy them at your earliest convenience.  That being said, I am not a lawyer either, so you’ll want to review your policies and the laws in your region.

Resetting the Passwords for All Users

The context of this DNN tip is to allow you access to literally impersonate the users on a DNN site.  If the number of users is low, I’d suggest leaving this article now to use my DNN Demo Skin Objects.  Seriously, they’re pretty cool.  You should check them out.
Ideally, it would be convenient if you knew all of the passwords of the users on the site, but we won’t and we shouldn’t.  Instead, we’ll change every password for every user to “password” using the ASPX file below.  All you have to do is create an ASPX file in the root of the site, paste this code into it, and then view it in a web browser of your choice.  From there, it’s a single click to reset all of the passwords to “password.”

WARNING!!!  Never do this on a production site for any reason or put this file on a production server, anywhere.  Also, it should only be used for LEGAL and ETHICAL purposes.
The code below does the meat of the work for you, but you can just download the file by clicking the button below and save yourself some time.  

private int PortalId
    {
        get
        {
            return PortalController.GetCurrentPortalSettings().PortalId;
        }
    }
    protected void ProcessUsers(object sender, EventArgs e)
    {
        try
        {
            IterateThroughUsers();
        }
        catch (Exception ex)
        {
            Exceptions.ProcessModuleLoadException(this, ex, true);
        }
    }
    private void IterateThroughUsers()
    {
        var sb = new StringBuilder();
        var totalRecords = 0;
        sb.Append("
Updating Superusers
");
        var superUsers = UserController.GetUsers(false, true, Null.NullInteger);
        UpdateUserInfo(superUsers, ref sb);
        sb.Append("
Updating Normal Users
");
        var normalUsers = UserController.GetUsers(PortalId, -1, -1, ref totalRecords, true, false);
        UpdateUserInfo(normalUsers, ref sb);
        plcUserLog.Controls.Add(new LiteralControl(sb.ToString()));
    }
    private void UpdateUserInfo(ArrayList users, ref StringBuilder sb)
    {
        foreach (var user in users)
        {
            // convert the user object to UserInfo
            var oUser = (UserInfo)user;

            // update the password
            // REQUIRES: Change the enablePasswordRetrieval attribute to True in the web.config
            // for newer versions of DNN, use this:
            //MembershipProvider.Instance().ResetAndChangePassword(oUser, "password");
            var success = DotNetNuke.Security.Membership.MembershipProvider.Instance().ChangePassword(oUser, string.Empty, "password");
            sb.AppendFormat(
                success
                    ? "
{0} {1} ({2}) updated with a new password.
"
                    : "
{0} {1} ({2}) NOT UPDATED!
", oUser.FirstName, oUser.LastName,
                oUser.Username);
            // save the user
            UserController.UpdateUser(PortalId, oUser, false);
        }
    }

I hope this article helpful for you, happy Coding :)


DotNetNuke - ASPHostPortal.com :: Tips To Add jQuery To your DotNetNuke Skin

clock Junie 23, 2016 20:30 by author Armend

Tips To Add jQuery To your DotNetNuke Skin

At this point you’ll be hard pressed to find a site that does not use jQuery. It has become a requirement for many to bring flash like experience in the form of photo sliders or fast responding ajax applications.
Over that time adding jQuery to DotNetNuke (DNN) has not always been straight forward. DNN ships jQuery as part of the core framework and you might assume that it’s always available. But one of the most widely unknown issues is that it must be requested on every page in order for it to be available.


Common Symptoms:

  • Main menu does not show sub items.
  • Homepage slider does not rotate.
  • Layout is malformed.
  • Works fine when logged in but not when logged out.

When you login as an administrator jQuery will always be available since the control panel bar request it. However if you logout on that same page it might not have been requested by any module or skin object on that page.

Not Recommended Ways To Add jQuery

  • Do Not: Add script tag into page settings or in your skin file.
  • Why? This will potentially add multiple jQuery reference to your page. The real issue is if any plugins are registered between the first reference and the second reference they won’t be available after the second reference is instantiated.

<script type="text/javascript" src="//ajax.googleapis.com/ajax/libs/jquery/1.10.2/jquery.min.js"></script>

Recommended Way To Add jQuery

In your skin file you you can reference and add the control for jQuery. This will ensure that jQuery is available on every single page and that it will only be referenced one time. You also get the benefit of the Client Dependency Framework (CDF).

<%@ Register TagPrefix="dnn" TagName="jQuery" src="~/Admin/Skins/jQuery.ascx" %>
<dnn:jQuery runat="server"></dnn:jQuery>

You can optionally add public properties to register jQuery UI, DNN jQuery Plugins and Hover Intent.

<dnn:jQuery runat="server" jQueryUI="true" DnnjQueryPlugins="true" jQueryHoverIntent="true"></dnn:jQuery>

Note: The search skin object will also register jQuery.


DotNetNUke - ASPHostPortal.com :: How To Create An Announcement With A Slider

clock Junie 8, 2016 20:57 by author Armend

DotNetNuke has come a long way recently with making things much more w3 compliant. This has allowed for more than just cleaner code; it has also allowed for much more control of your website through jQuery and CSS. Also, according to the forums, it looks like things are getting even better for compliance and control. In this tutorial, we will tell you how to create an announcement with a slider in DotNetNuke.


One of our favorite updates of DNN modules to this new compliance, is the DNN Announcements module. With the latest release, we now have the ability to set up the announcements as a list and apply some cool jQuery to it. We decided that we wanted to have the main image fade in and out and the title and description to slide in from the bottom. We came across the s3Slider jQuery plugin which seemed to provide exactly what I was looking for. We have outlined the steps below on how to add it to your DotNetNuke site.

The HTML

  • Add the Announcements module to your page.
  • Click the “Settings” link.
  • Expand the “Announcements Settings”
  • Remove exisiting code from Header Template, Item Template, and Footer Template.
  • In the “Header Template:” text area, enter the following code:

<div id="s3slider">
<ul id="s3sliderContent">

  • In the “Item Template:” text area, enter the following code:

If you want your description area to be at the top of the image area, use the class top in the span.
If you want your description area to be at the bottom of the image area, use the class bottom in the span as I have here.

<li class="s3sliderImage">
[IMAGESOURCE]<span class="bottom"><strong>[TITLE][EDIT]</strong><br />
[DESCRIPTION]<br />
[READMORE]</span>
</li>

  • In the “Footer Template:” text area, enter the following code:

<li class="clear s3sliderImage"></li>

  • Also, in the “Footer Template” area close out the ul and div that was started in the “Header Template” area

The CSS

In your skin.css file, insert the following styles: (note the widths and heights in the CSS. They need to be exactly the same as the image for the announcemnts.)

#s3slider { width: 500px; height: 242px; position: relative; overflow: hidden;}
#s3sliderContent { width: 500px; position: absolute; top: 0; margin-left: 0;}
.s3sliderImage { float: left; position: relative; display: none;}
.s3sliderImage span { position: absolute; font: 14px/21px Arial, Helvetica, sans-serif; padding: 10px 13px;  width: 500px; background-color: #000; filter: alpha(opacity=70); -moz-opacity: 0.7; -khtml-opacity: 0.7; opacity: 0.7; color: #fff; display: none;}
.top { top: 0; left: 0;}
.bottom { bottom: 0; left: 0;}

The jQuery

Now that we have all of that in place, we can add the jQuery to make it work.

  • Include a refrence to jQuery in your skin. This is already done if widgets are inabled on your site.
  • Download the files from the s3Slider site. http://www.serie3.info/s3slider (link opens in new window)
  • Upload the s3Slider.js file to your skin folder.
  • In your skin file (for example: skin.ascx), enter the following code: (you can put this at the top or the bottom of your skin)

<script type="text/javascript" src="<%= SkinPath%>s3Slider.js"></script>
<script type="text/javascript">
    $(document).ready(function() {
       $('#s3slider').s3Slider({
          timeOut: 7000
       });
    });
</script>

  • Now just start adding the content of your announcements! Be sure to make your images the same size as what is set in the CSS.

DotNetNuke Hosting Recommendation

ASPHostPortal.com

ASPHostPortal.com is Perfect, they have a suitable hosting plan for a starter in DotNetNuke Hosting. ASPHostPortal is the leading provider of Windows hosting and affordable ASP.NET Hosting. ASPHostPortal proudly working to help grow the backbone of the Internet, the millions of individuals, families, micro-businesses, small business, and fledgling online businesses. ASPHostPortal has ability to support the latest Microsoft and ASP.NET technology, such as: WebMatrix, WebDeploy, Visual Studio 2015, .NET 5/ASP.NET 4.5.2, ASP.NET MVC 6.0/5.2, Silverlight 6 and Visual Studio Lightswitch, ASPHostPortal guarantees the highest quality product, top security, and unshakeable reliability, carefully chose high-quality servers, networking, and infrastructure equipment to ensure the utmost reliability.


DotNetNuke - ASPhostPortal.com :: How To Create A Web farm For Your DotNetNuke Website

clock Junie 3, 2016 20:40 by author Armend

How To Create A Web farm For Your DotNetNuke Website

With a little luck and a lot of hard work there will come a time when your website’s popularity outgrows the capabilities of a single server. It’s time then to consider moving to a server-cluster also called web farm where you can host your website over multiple servers, balancing and shifting the load all across them so that your visitors continue getting the fast website experience that they’re used to.

Server clustering is now a part of Windows Server and IIS 7, so you can easily set up your web farm and get a dramatic boost in your website’s performance by setting up shared configuration for your website with 2 or more servers.
By using a server farm you can also avoid buying newer and costlier hardware, putting older servers to work to share the load at a lower cost. Additionally a web farm also enhances the security by creating redundancy which will keep the website online and functioning even if one of the server fails.
In this article we will learn how to set up your web server farm through IIS 7 Shared configuration feature for your DotNetNuke website.
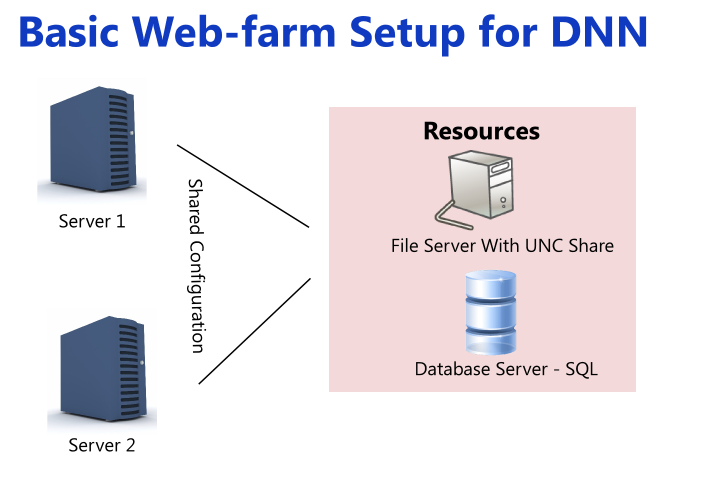
 

Requirements for a DotNetNuke Web Farm

Setting up a web farm for DotNetNuke requires a setup in which there are at least two servers to handle the client requests. The servers access the files from a separate file server and the database from a special database server.  The requests are routed to the servers by a special load balancer which makes sure that the requests are evenly divided between the servers.

If your application does not have major file writing operations you can also store the files locally on the two servers and remove the file server from the configuration. This server setup uses file replication to store the files across all front-end servers and any file change on one of the servers is replicated across all servers. This scheme is not suitable if your servers need a lot of file updates and changes because of the extra load that will impose.
Setting this up on IIS7 has become easier than ever thanks to the new Shared configuration feature of IIS7 which allows you to place a common configuration file that will automatically configure all the front-end server you possess.

There are two stages to setting up a web farm for DotNetNuke. You have to configure DotNetNuke to work with a web farm and you have to configure a web farm environment At the server level.
Let’s discuss the configuration of DotNetNuke first. We’ll learn how to configure IIS7 shared configuration a little while later.

Setting up DotNetNuke for Web farm

Modifying the Web.config File to Enable Web Farm Support for DotNetNuke
DotNetNuke uses the web.config to store application settings that decide how it will work. To enable the support for web-farms you have to tell DotNetNuke that it’s in a farm environment. To do this you need to enable web farm support in the Config file.

  • Create Common Machine Keys : DotNetNuke requires that the machine keys of all the frontend servers in the web farm be identical. You can choose the machine keys of any server and must copy it across the servers. The machine two keys to replicate are ‘MachineValidationKey’, and ‘MachineDecryptionKey’.

  The Keys are in configuration->appsettings section of the web.config file.

  • Enable Web Farm : Check that the EnableWebFarmSupport setting is set to ‘True’ in the Configuration->AppSettings section of the configuration file. If this setting does not exist then add it.
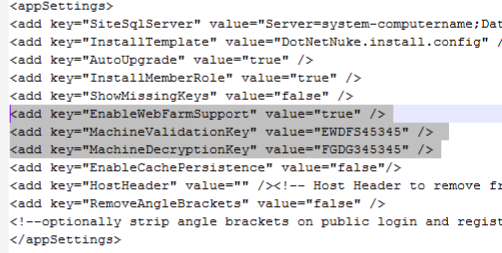
  • Add Support for DB Logging Provider : In a farm environment the logs must be kept in a database. You need to setup DotNetNuke to keep the logs in a database. To do this make sure that the value of the defaultProvider node in configuration->dotnetnuke->logging node is set to ‘DBLoggingProvider’.
  • Setting up the Scheduler : DotNetNuke’s scheduler which looks after the regular maintenance tasks needed to keep the website running popularly must also be configured according to the needs of the web farm. Some of the tasks must be run on each machine, while others must be run on specific ones. You’ll need to change the schedule manually.

To change the task schedule first log in as the Super User and go to the Schedule option of the Host menu. Clicking on the button ‘Run on Servers’ will bring a text-box where you can fill the server name where you want each task to run.

The tasks that you may need to modify include : DotNetNuke.Services.Scheduling.PurgeScheduleHistory, DotNetNuke.Services.Log.Eventlog.SendLogNotifications, DotNetNuke.Services.Search.SearchEngineScheduler, DotNetNuke.Modules.Admin.ResourceInstaller.InstallResources, and DotNetNuke.Services.FileSystem.SynchronizeFilesSystem.

You’ll also need to enable the task DotNetuke.Services.Cache.PurgeCache. Make sure this task is enabled and updated.

  • Enable File Based Caching : DotNetNuke does not support database based caching in a web farm scenario. To optimize the caching performance the caching should be file based only. Make sure the node configuration->dotnetnuke->caching has the value ‘FileBasedCachingProvider’ for the attribute ‘defaultProvider’.

Configuring IIS 7 To Work With Your Web farm

Before IIS7 setting up a web farm on IIS was a non-trivial affair because IIS offered no automated replication and configuration across all servers. From IIS7 you can create a standard configuration on one server and replicate it across all servers by sharing only some configuration files. This makes it much more easier to create a web farm for your websites.
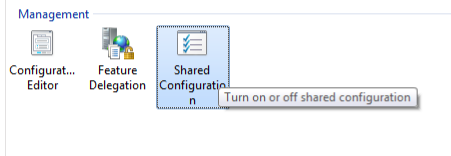
First configure your web server as usual to host the website, and when you’ve set up everything use the ‘Shared Configuration’ facility of IIS to export the server configuration files. The files should be exported to a UNC Share location which will be accessed by all the servers in the web farm for the configuration settings.
You will have to similarly enable shared configuration across all your servers and point to the same location where you have the original configuration settings saved. All the servers will copy those configuration settings.
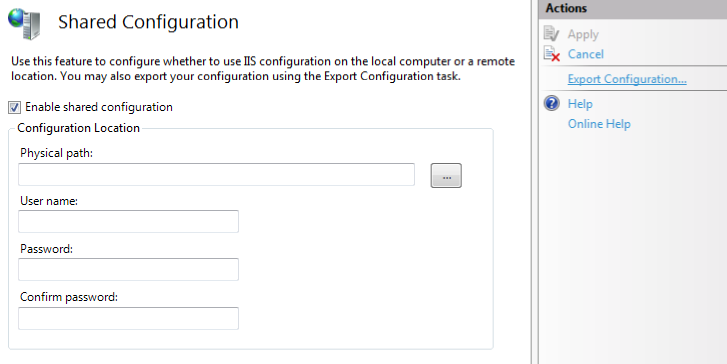
You can easily setup the file server using the following command on the command prompt of the server which you want to use as the file server. Otherwise you can also use the windows graphical interface to set the necessary user permissions for the shared area.

md %SystemDrive%\serverconfig
net share serverconfig $=%SystemDrive%\serverconfig /grant:Users,Change

Note that we are also granting the users the right to modify the shared  contents.

The UNC share will also act as a file shared server, and the servers will grab the files from the share to serve to the client requests. Make sure that you set the file server location as the Home directory of the web server to enable this. A file share is essential to a DotNetNuke web farm.

This concludes the tutorial to establish a Web farm for your DotNetNuke website. If you have made the configuration changes to both DotNetNuke and IIS then your web farm environment should be up and running.


DotNetNuke - ASPHostPortal.com :: Tips to Help You Save Money and Build Your Business with DotNetNuke Hosting

clock Mei 26, 2016 19:48 by author Armend

Tips to Help You Save Money and Build Your Business with DotNetNuke Hosting

When it comes to publishing new content online, the tasks of modifying and writing code can be overwhelming to the novice user. Even for the more experienced web developer, altering how content displays on your web page can be so time-consuming that the focus shifts away from offering the best content possible to your visitors. However, maintaining high-quality web content is incredibly important, whatever the scale of your business. Finding effective ways to communicate the value of your products and services to visitors can help you transform them into long-term customers.

To make publishing and editing web content more streamlined, a content management system (CMS) provides a framework for creating web content that effectively removes the need to work at the level of pure code. For users of Windows hosting services and ASP.NET web hosting, DotNetNuke offers a simple, web-based control panel which, after configuration to suit your layout needs and your ongoing plans for content type, can make working with content quicker and easier than ever before.

DotNetNuke hosting and discusses how DotNetNuke has grown to power over 700,000 of the world’s most popular websites. In addition, the article identifies the key benefits of choosing DotNetNuke hosting services for your business and the tangible impact this can have on your revenue.
Offer attractive web content with DotNetNuke web hosting services

In order to remain competitive online, more and more businesses are beginning to understand the need for a long-term content strategy. Whether this involves adding new products to an online catalogue on a regular basis, or posting daily blogs and news updates on how your company is progressing, offering new, worthwhile content is a surefire way to not only keep potential customers interested, but also to boost your presence in search engine results and in the wider industry of which you are a part.

The article provides insight into the most frequently-used features of the DotNetNuke content management system, including user permissions to control access to certain pages, skins and add-ons to alter the core functionality of the system, and DotNetNuke’s outstanding performance as part of an ASP.NET hosting solution.
Furthermore, the article explains the impact of the features included in DotNetNuke web hosting and how these features can actively help your business to grow online. By reading the article, you will learn how choosing DotNetNuke web hosting services can give you the competitive edge you need to attract more visitors, keep them browsing your website for longer, and ultimately increase conversion rates to boost your revenue.

DotNetNuke hosting plans available now from ASPHostPortal.com

ASPHostPortal.com is a specialist in Windows web hosting services and offers complete DotNetNuke support across every Windows hosting plan. Whether you are looking for shared hosting or dedicated server hosting, ASPHostPortal.com supports DotNetNuke web hosting on our ASP.NET hosting services, web hosting services, and Windows reseller hosting plans. Every Hostek.com Windows hosting service is offered on highly-reliable hardware, within a highly-reliable network facility.
In addition, DotNetNuke web hosting services from ASPHostPortal.com come with 24/7/365 expert support service, a 99.99% service level agreement (SLA), and a 30-day money-back guarantee.


DotNetNuke - ASPHostPortal.com :: Tips Securing Your DNN Website

clock Mei 12, 2016 21:43 by author Armend

Tips Securing Your DNN Website

DNN is the most powerful asp.net CMS software that's loved by millions of users and communities. The DNN local communities exist in most countries with different languages support. There're many people living by dnn development on modules and skins. It's also very good learning platform for .net programmers. Because of it's leadership in asp.net, it's crucial to understand some security tactics in using this software. We have been worked with DNN since 3.2 and supported lots of dnn clients on live hosting service. Following DNN security tips are generated from our daily experience and professional suggestions in DNN community.


Secure installation

Security is started before your initial dnn installation. As suggested by this article, DNN keeps user password via encrypted format and we can improve it using hash. But we must edit configuration file before installation. Also, unless you have a blade fast hosting server, we highly suggest install locally first then move to hosting space. From our experience, dnn installation wizard can fail easily. In case you get unsuccessful installation, the wizard can be restarted when people browse to your domain.

Admin/Host credentials

By default, DNN provides two user accounts admin/host. Actually we can change the two user id to anything else and apply enhanced password policies. DNN can be auto installed by various installers nowadays but we highly recommend to install manually so you can understand the entire process and secure the installation as much as possible.

Use Captcha

Captcha is great feature to reduce spam registration and submission on your DNN site. Captcha is a built in feature and it can be enabled via admin user login. In case you run into problems to enable this feature, this article should help fix it. There're also multiple official articles on how to customize the captcha image, just make a bit research and you'll be surprised how fantastic it is.

Set proper file permission

DNN is programmed on asp.net platform that highly rely on "networkservice" this user account to work with. We must grant "RWXD" permissions to this user to ensure everything can work fine. However, we should restrict other user accounts permission correctly or else it will bring big security issue. We highly recommend to follow this official tutorial to configure the right file permissions.

Do not use sql express

SQL express is the free edition of sql server service. We don't recommend use it for your live website. Not just for performance but also refers to daily maintenance. Since both website files and database are located on the same server, any misconfiguration might bring big security issues. For enterprise website purpose, full version sql server is a must because it's configured on dedicated sql server environment. As we know, the less service on server, the more secure it is.

Use reliable module/skin resource

Because lots of developers live by module/skin development, there're many dnn resources we can get. However, we must find a reliable provider because each developer has different programming skills. The script design decides its overall secure level directly so we must pay good attention to it. DNN now provides official store for commercial skins/modules. All of their products are verified by DNN official team for guaranteed performance and security. If you need commercial solutions, their official store should be primary consideration.

Check DNN Logs

You don't have to login hosting server for website logs. DNN has built in log system to record all server end and onsite activities. You can view how your website be accessed and which user logged in at what time. Check those logs often and find if there's anything inormal so you can apply necessary changes in time.

Use a reliable DNN hosting

Probably the most important part. Hosting server is the destination of all your datas so it's quite important to get a right provider in the beginning. No matter how much time it may take, we don't need to quarrel with customer support at a bad hosting service. The best dnn hosting service must be setup on latest windows server system and up to date hardware production. Network must be safe and clean with good protection over common attacks.
If you have extremely high requirements to performance and security, powerdnn might be the right place because their team members are actually dnn developers and work for DNN official! if you need budget choice, you might check out winhost who's dedicated in windows hosting service.


DotNetNuke - ASPHostPortal.com :: Tips To Make DotNetNuke Sites Run So Fast

clock April 28, 2016 20:08 by author Armend

Overview

First of all I want to start out by saying that a lot of the information that is displayed here can be found in previous blog postings.  Posts such as DotNetNuke Host Settings Explained, DotNetNuke Scheduler Explained, DotNetNuke Performance Settings Explained, and Simple DotNetNuke Performance Enhancements.  Are good starting points for some of the detail behind my recommended changes.


The following changes are simply the configurations that I have found to be the best "baseline" configurations.  Consideration is needed in regards to the site setup, update frequency, traffic, hosting environment and users to ensure that you have the proper setup for your specific environment.  I will discuss the settings section by section, simply noting the changes that are made.  Please reference the specific "Detail" document for more information.

DISCLAIMER: Follow these recommendations as a guide only, I am not responsible for any effects of implementing these changes.

Host -> Host Settings Changes

The first place I visit is the Host Settings page.  There are a number of key updates and changes needed in this section.  Again, only changes are noted here.

Appearance

In this section I unchecked the "Show Copyright Credits" box

Advanced -> Authentication Settings

In this section I unchecked "Enabled" for any provider that will not be used in the portal, typically the LiveId and OpenId providers

Advanced -> Performance Settings

In this section I change the "Module Caching Method" to Memory.  the "Performance Setting" to HeavyCaching.  And the "Compression Setting" to GZip Compression.

Advanced -> Other Settings

In this section I change the "Scheduler Mode" to Timer.  I enable the "Event Log Buffer" and I disable the "Auto-Sync File System" option
These are the most common Host Settings changes that I complete.  Depending on the site I'll make a few other small edits.

Host -> Scheduler Changes

The biggest change that I make here is to change the "SearchEngineScheduler" task to run typically once every 12/24 hours.  This reduces a big load on the server.

Other Changes

From a DotNetNuke configuration change that is all that I modify.  Overall those changes typically result in very noticeableperformance improvements, but many times it just isn't enough to keep the sites running as smooth as possible.  So depending on the situation I have a number of other items that I work with.

Regular Purging of Event Log

As most people that have used DotNetNuke have discovered the EventLog table can become a very troublesome hindrance on the performance side of a site.  Enabling the Event Log Buffer helps reduce the effects of a large EventLog, however, the best policy is to clean the EventLog on a regular basis.
I do this one of two ways.  On my own sites I have an SSIS package within SQL Server that truncates the table every 24 hours.  On client sites I utilize my Scheduled SQL Jobs module to keep a 7 day rolling history of the EventLog data.  The key here is that we MUST keep the event log small.

Skin Selection and Menu Provider

The next item of consideration is a multi-part consideration.  I focus on finding CSS based skin layouts that utilize third party menu components such as Telerik and Css NavMenu.  With a simple skin change to sites I have noticed page load times that have reduced by over 50%.
Finding a good designer that creates well laid-out skins with third party menu providers has been a key performance enhancement, at least in the page.  I have NOT benchmarked these numbers though since DNN 4.6.2, so the core menu provider might have better performance.

Compression/Caching Modules

As a last step, if I really need to get the most performance out of a site I will tend to lean towards Snapsis PageBlaster as a good option.  I currently use PageBlaster on this site only and have had very good luck with it, although when configuring the module you must be careful to test all functionality first.  This was another change that once implemented I noticed very visible performance improvements.

Summary

There you have it, that is my secret trick to improving DotNetNuke site performance!  Many people charge a lot of money to make these simple performance tweaks and I just laid them all out on the table for you free of charge.


DotNetNuke - ASPHostPortal.com :: How to Activate Google Analytics on Your DNN Site

clock April 19, 2016 00:07 by author Armend

How to Activate Google Analytics on Your DNN Site

You can't go wrong using Google Analytics (GA) to track the performance of your site. It has awesome reporting capabilities and you can't beat the price; it's free! And out-of-the-box DNN is fully integrated with Google Analytics. Just follow these instructions and you'll be running Google Analytics in a matter of minutes.

To Activate Google Analytics on your Site

  • Get your Google Analytics Account Number : Your first step is register you complimentary Google Analytics account. These is no charge for this GA account, and it takes just a couple of minutes to get your account number. Visit www.google.com/analytics to activate your Google Analtics account; and click the Access Google Analytics button and follow the on-screen instructions. When you have your GA account number you are ready to go to Step 2 below.
  • 2 Install your Tracking Code : Google Analytics tracks your site activity through the use of a javascript snippet that contains your GA account number (also known as your tracking ID). This javascript tracking code must appear in the <head> section of every page you want to have tracked.

Good news—DNN automates this for you. All you have to do is add your GA account number to a field on your site and DNN takes care of the rest. Here's what you do:

  • Login to your DNN site using an Administrator account.
  • Go to the Admin | Google Analytics page. You will see a field where you enter your GA account number:
  • Paste your GA account number into this field and click Update.

That's it! Google Analytics will now start tracking your site.

Verify your Setup

It can take up to 24 hours for data to appear in your Google Analytics account after you've installed your tracking code. But in the meantime, you should take a minute to confirm that your tracking is setup correctly. You can confirm your tracking using any of the following options:

  • View Page Source Code : Take a quick look at the source of a page on your site to make sure your Google Analytics javascript is there. As long as you see javascript code similar to the following (with your own tracking ID value) of course, your setup is correct:

  • Check your Google Analytics Dashboard : Login to your Google Analytics account (www.google.com/analytics)  and click the Admin link. You should see a status of 'Waiting for Data.' This indicates that your code is correctly installed, but no data has been collected yet. If you return in roughly 24 hours you should see this status change to 'Tracking Installed' and you are good t


About ASPHostPortal.com

We’re a company that works differently to most. Value is what we output and help our customers achieve, not how much money we put in the bank. It’s not because we are altruistic. It’s based on an even simpler principle. "Do good things, and good things will come to you".

Success for us is something that is continually experienced, not something that is reached. For us it is all about the experience – more than the journey. Life is a continual experience. We see the Internet as being an incredible amplifier to the experience of life for all of us. It can help humanity come together to explode in knowledge exploration and discussion. It is continual enlightenment of new ideas, experiences, and passions

Author Link


 photo ahp banner aspnet-01_zps87l92lcl.png

Corporate Address (Location)

ASPHostPortal
170 W 56th Street, Suite 121
New York, NY 10019
United States

Tag cloud

Sign in