
April 30, 2014 07:05 by
 Kenny
Kenny
DotNetNuke is a web content management system based on Microsoft .NET. The Community Edition is open source. DotNetNuke was written in VB.NET, though the developer has shifted to C# since version 6.0. It is distributed under both a Community Edition MIT license and commercial proprietary licenses as the Professional and Enterprise Editions.

In this article, I will explai n about how to allow large file uploads in DotNetNuke. Usually we come across the requests to set larger file uploads for the editor in DotNetNuke. The default setting allows you to upload 4mb which if you want to upload media files is not enough. Here are the changes required to upload larger files via editor and file manager in DotnetNuke.
The example is based on using the TelerikEditorProvider set as the default html editor for the site and is based on DNN 7.0
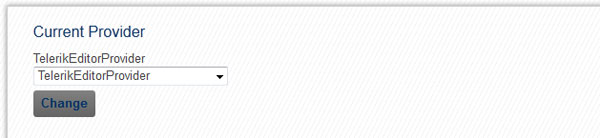
1. First, you must set the TelerikEditorProvider as the default editor for the site.
Under host HTML Editor Manager you can see the current provider and change it if required to TelerikEditorProvider
2. Set the default upload size for the file managers
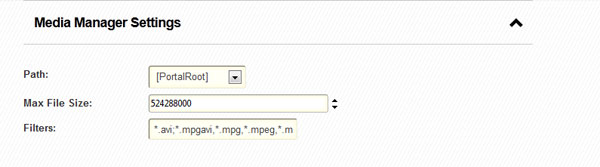
By clicking on everyone under Default Configuration you can access the editor settings. In the editor configuration tab you can allow additional file extensions (make sure they are set as allowed under host settings as well) and set the file upload size for all types of file managers.
The values are in bytes so for example 524288000 = 500mb.
Here are the settings for the Media Manager.
3. Change the ConfigDefault.xml values
If after this you still can see only 4mb as allowed file size in the editor you will have to digg in a bit deeper. Download (make sure you make the backup) ConfigDefault.xml from /Providers/HtmlEditorProviders/Telerik/Config/
Change the required manager properties
<property name="MediaManager.MaxUploadFileSize">4194304</property>
for 500mb upload change to
<property name="MediaManager.MaxUploadFileSize">524288000</property>
The values are in bytes 524288000 = 500mb
Save an upload to /Providers/HtmlEditorProviders/Telerik/Config/ overwiting the current file.
4. Changes in the web.config file
Make sure you make the back up and then find the following code
<!-- Forms or Windows authentication -->
<authentication mode="Forms">
<forms name=".DOTNETNUKE" protection="All" timeout="60" cookieless="UseCookies" />
</authentication>
<!--
<identity impersonate="true"/>
<authentication mode="Windows">
</authentication>
-->
<!-- allow large file uploads -->
<httpRuntime useFullyQualifiedRedirectUrl="true" maxRequestLength="8192" requestLengthDiskThreshold="8192" />
First change
<forms name=".DOTNETNUKE" protection="All" timeout="60" cookieless="UseCookies" />
to
<forms name=".DOTNETNUKE" protection="All" timeout="9000" cookieless="UseCookies" />
This will prevent the timeout during upload, the value is in seconds.
After that change
<httpRuntime useFullyQualifiedRedirectUrl="true" maxRequestLength="8192" requestLengthDiskThreshold="8192" />
to
<httpRuntime useFullyQualifiedRedirectUrl="true" maxRequestLength="512000" requestLengthDiskThreshold="512000" />
This value is in kilobytes 512000 = 500mb
In some cases this should be all, however if you receive I/O error during upload there is another line of code you need to add in web.config
in
<configuration>
<system.web> section.
<configuration>
...
<system.web>
<httpRuntime maxRequestLength="512000" executionTimeout="9000" />
...
</system.web>
</configuration>
The maxRequestLength value is in kilobytes 512000 = 500mb
5. Changes in IIS7
Sometimes in IIS7 and if you have access to the server you may need to check that the overrideModeDefault property is set to to "Allow" in C:\Windows\System32inetsrv\config\applicationHost.config
<section name="requestFiltering" overrideModeDefault="Allow" />
Following these steps you should be able to set the file upload limits up to 2GB.
April 14, 2014 07:25 by
BenThe DNN login page is the most forgotten part in all DNN users and even some professional DNN portals. There are few modules that allow you to have a simplified login or pop up login like digg.com but you need to pay or it and it is not cheap and easy to change the design.
In order to make changes to your DNN Login page, you have to understand the components in the login module. The DNN Login module consists of 4 parts which is the DNN Membership Authentication System, The Authentication Provider, The Login Module itself and the Language Resources Files (.resx).
In this tips I am not going to explain how to create new DNN module and its settings. Instead, I will try explaining how to register a new user and login from a custom module interface by using Dotnetnuke class methods.
User Registration Interface:
For building a Custom Registration module we need to have required fields like, firstname, lastname, emailId, username and password in a form also need to add required field validation to these fields. For registering a new user we need to fill the above information to the UserInfo object present within DotNetNuke.Entities.Users namespace.
using DotNetNuke.Entities.Users;
using DotNetNuke.Security.Membership;
UserInfo objUser = new UserInfo();
objUser.PortalID = this.PortalId;
objUser.IsSuperUser = false;
objUser.FirstName = txtFirstName.text;
objUser.LastName = txtLastName.text;
objUser.DisplayName = txtFirstName.text + " " + txtLastName.text;
objUser.Email = txtEmail.text;
objUser.Username = txtUserName.text;
UserMembership objMembership = new UserMembership();
objMembership.Approved = true;
objMembership.CreatedDate = DateTime.Now;
objMembership.Email = txtEmail.text;
objMembership.Username = txtUserName.text;
objMembership.Password = txtPassword.text;
objUser.Membership = objMembership;
UserCreateStatus result = UserController.CreateUser(ref objUser);
if (result == UserCreateStatus.Success)
{
Response.Write("user registered successfully");
}
Custom User login Interface:
We need to have Username, Password text field and a Login Button in a Form.
- UserController class having ValidateUser method to validate user:
UserInfo UserController.ValidateUser(int portalId, string Username, string Password, string authType, string Verificationcode, string Portalname, string IP, ref UserLoginStatus loginStatus) UserLoginStatus object is used to check the status of User before login.
- UserController class also having UserLogin method using which we can login into website through programming from our custom module:
void UserController.UserLogin(int portalId, UserInfo user, string portalName, string IP, bool CreatePersistent)
CreatePersistent is used to remember the password after login
protected void btnSignin_Click(object sender, ImageClickEventArgs e)
{
UserLoginStatus loginStatus = UserLoginStatus.LOGIN_FAILURE;
UserInfo objUserInfo = UserController.ValidateUser(this.PortalId, txtUserName.text,
txtPassword.text, "DNN", "", PortalSettings.PortalName, this.Request.UserHostAddress, ref loginStatus);
if (loginStatus == UserLoginStatus.LOGIN_SUCCESS || loginStatus == UserLoginStatus.LOGIN_SUPERUSER)
{
bool isPersistent = false;
UserController.UserLogin(this.PortalId, objUserInfo, PortalSettings.PortalName, this.Request.UserHostAddress, isPersistent);
this.Response.Write("Login success");
}
else
{
this.Response.Write("Login failure");
}
}
Need DotNetNuke cloud hosting? Please visit our site at http://www.asphostportal.com. Just with only $4.00/month to get DotNetNUke cloud hosting. If you have any further questions, please feel free to email us at [email protected].
ASPHostPortal.com, Microsoft No#1 Recommended Spotlight Hosting Partner, is now providing this FREE DOMAIN and DOUBLE SQL Space promotion link for new clients to enjoy the company's outstanding web hosting service.
April 2, 2014 09:56 by
Kenny
Good news, no you can adapt DotNetNuke portal to mobile devices without changing your existing desktop experience. The latest trend in web development is exciting to say the least - with increasing in Mobile device penetration around the globe. Mobile devices already have displaced many of the fixed-location technologies especially in rural in developed world or countries like India Brazil and China that are currently filling the global economic growth. MobiNuke is exposing a rich set of mobile device capabilities available to be used by module or skin developers.
Main Features
- You will apply separate skins for mobile experience.
It can be when you want to set different skins that will be applied when pages are accessed from mobile devices. Don’t worry it will not change the skin for your desktop browsers. And now skin designers can develop mobile friendly skin sets together with desktop skins.
- Mobile devices access the portal through a lighter page.
It will be fast, because anything that is not needed by a mobile device is cleaned out. The content type and MIME type are set to specific values for mobile browsers.
- It’s up to you for enable or disable any existing modules for mobile context or for PC.
You can set some modules to show only on PC and others only on mobile devices. You can do different set up for each page.
- Support for mobile versions of existing modules.
Developers can extend their modules for mobile context.
- Expose mobile device capabilities.
Developers can get properties such as device type, screen dimensions, if JavaScript or online video is supported and more than 500 other mobile device properties.
How to Make it Work
- Download and install MobiNuke through Host->Module Definitions-> Install New Module.
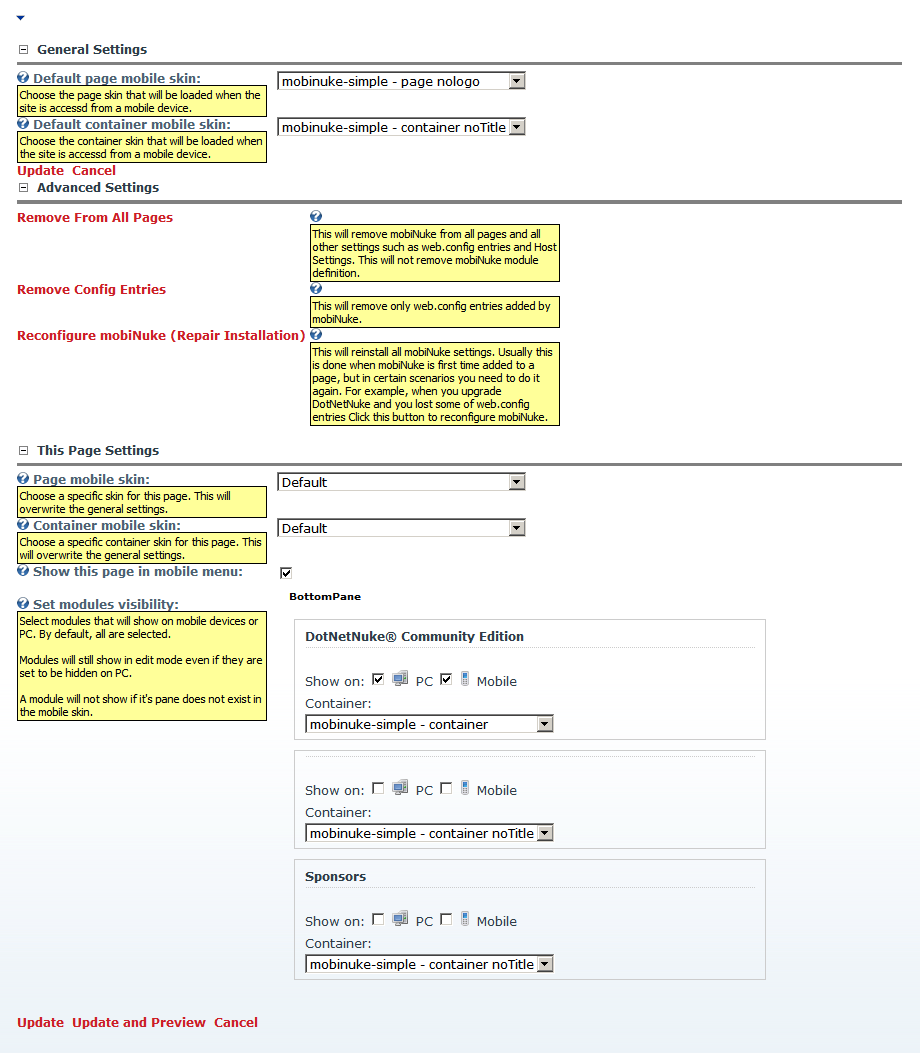
- Add mobiNuke to any page. It will add itself to all the pages and will act as an extra setting.
- Click on Mobile Settings to configure general settings and page specific settings for mobile access.
Technical Details
MobiNuke contains 5 components:
- A httpModule that redirects request coming from a mobile device to DefaultMobi.aspx
- A DotNetNuke Module with the following functions:
- When added for the first time it will auto-configure itself to be present on all pages;
- Manage the skin to be loaded when the page is accessed from a mobile device;
- Preview the page close to the way it looks on a mobile device;
- Enable or disable tab modules for mobile pages;
- A DefaultMobi.aspx page for mobile context that has the same function as Default.aspx. Anything that is not usable on mobile devices is cleaned out.
- A set of minimal skins suitable for mobile browsing. Currently the mobile skin contains only the ContentPane. It only shows the corresponding modules from the ContentPane of the desktop skin.
- A mobile friendly navigation provider.