
Augustus 23, 2014 09:00 by
 Kenny
Kenny
DotNetNuke is an open source CMS based on Microsoft .Net technology. DotNetNuke can be easily installed and hosted. In general, DotNetNuke framework allows individuals to do whatever they wish with the application framework both commercially and non-commercially, with the simple requirement of giving credit back to the DotNetNuke project community. In this article, I will tell you how to automate the packaging of your DNN Module.
DotNetNuke is a program that runs on Microsoft ASP.NET. It is also a framework, meaning, it is a program that is designed to be extended. One of the ways you extend the framework is to create modules. These modules are installed inside a DotNetNuke installation and when they run in that DotNetNuke installation they extend the framework to create a DotNetNuke website also called a portal.
Here are the steps for automate the packaging of your DNN Module:
- Delete all source code and start over from scratch with my templates installed. If you really don’t want to go through step #1, you can skip it, but you must then go on to Step 2 below
- Open your project in Visual Studio
- Install the MSBuildTasks project from Nuget:
PM> Install-Package MSBuildTasks
- Create a BuildScripts folder in your project
ModulePackage.targets
MSBuild.Community.Tasks.Targets
- Right click on the project in Visual Studio Solution Explorer and choose “Unload Project”
- Right click on the unloaded project and choose the Edit option
- At the bottom of the file, before the </Project> section add
<PropertyGroup>
<Extension>zip</Extension>
<DNNFileName>CHANGEME.dnn</DNNFileName>
<PackageName>CHANGEME</PackageName>
<MSBuildCommunityTasksPath>$(SolutionDir)\Build</MSBuildCommunityTasksPath>
</PropertyGroup>
<Import Project="BuildScripts\ModulePackage.Targets" />
<Target Name="AfterBuild" DependsOnTargets="PackageModule">
</Target>
<Import Project="$(SolutionDir)\.nuget\nuget.targets" />
- Change the “CHANGEME” text to match the name of your .DNN file and the name of the ZIP file that you want the package created as.
- Save the Project changes.
- Right click on the project in Solution Explorer and choose Reload Project.
- Switch into Release mode in Visual Studio and do a Build of your project.
- This should create two files, ModuleName_Version#_Install.zip and ModuleName_Version#_Source.zip.
What I typically do then is install the module to a test DNN install to make sure that everything is working correctly. You’ll want to make sure that the ZIP files created contain all the right files, and they get installed correctly, so a test installation is the best way to go through that process.
If something fails, try to track it down, then do another Build in Release mode, rinse and repeat the installation process in your test install until you get everything working properly.
Now going forward, after you do a release, you go into your AssemblyInfo file, change your version number there, and into your .DNN File and change your Version number there. Next time you build in Release mode the module will create a new VERSION number ZIP file, leaving your last version builds there as well.
Augustus 18, 2014 10:14 by
KennyWhat is DotNetNuke?
DotNetNuke Platform, formerly called DotNetNuke, is a free, open source website builder and content management system based on the .NET framework. It is a tool designed to be used from a web browser that can create any type of website, from small business sites to online communities and intranets. In this article we will tell you about how to integrate DotNetNuke with SharePoint.

Integrate DotNetNuke with SharePoint
- Good knowledge of SharePoint and DotNetNuke - This particular approach helps in easy as well as seamless integration of both the document management system and the software making it easy for content monitoring along with modification. It is important to have good knowledge of the software as well as the application before taking up integration.
- Always integrate with SharePoint 2007 and 2010 – This particular objective helps you enjoy the best benefits of both the DotNetNuke along with the document management system. After all, it helps publishing fresh contents extracting it straight from the SharePoint Document library. The published documents are carefully protected by the role based security network of DNN.
- Always publish documents that are approved for display – Undertaking this particular approach always helps you to avoid any sort of interference with the team. This helps you ensure the use of a streamlined alongside a collaborative procedure that helps in effective management of the document. Additionally, it also allows you to share the best documents that are carefully edited and ready for use.
- Ensure consistent permission throughout the work – This particular objective if maintained right helps preventing any sort of unauthorized access thereby, ensuring a secure digital asset management. Additionally, it also helps preventing the redistribution of assets that are digital.
- Make use of views and not folders – This helps you ensure having unlimited flexibility along with extreme level of granularity. It is also important for you to be able to combine the properties easily and this particular approach helps in successful combination. The biggest advantage rests with the fact that it helps reducing overall risk alongside human error.
- Synchronize the deletes – Taking up this particular approaching during the process of integration also helps avoiding the errors of “file not found” during the successful execution of removal of files. This particular approach of cleaning also ensures reduction of unimportant database clogging, duplication, overall risk, and human errors.
- Enabling of error notification is must – This specific task helps in automatic synchronization eliminating the need of active viewing or monitoring of the document in concern. This result in a smooth process that helps you to lessen the effort along with the time required for content monitoring.
- Avoid the firewall – Always make sure that the SharePoint server can enjoy an easy access to the DotNetNuke server. This helps in smoother as well as better content management without any modification of security policies.
- Allow filtering of documents to be transferred – This particular approach helps the users to filter the documents easily through the integrated SharePoint filtering views. This helps the users to make use of the Create View UI and need not rely upon two different sets of filters.
Augustus 14, 2014 12:41 by
Kenny
Is DotNetNuke The Best Application for Developers, End Users and Organization?
Based on the.NET framework by Microsoft, DotNetNuke is a content managing system for websites. One of its advantages is the fact that the framework's Community Edition is open-sourced and has an MIT free software license, allowing free download, usage, modification, and extension. This, combined with the modular structure of the framework, has allowed various third-party developers to write and publish additional modules and upgrades to the basic package. Professional and Enterprise editions of DotNetNuke are paid for, but offer better tech support and certain features critical for business-level web-site management. However, the Community edition also receives a lot unofficial tech support from the extensive user and modder community.
DotNetNuke for Developers
DotNetNuke is a brilliant combination of Content management System (CMS) and Web application development framework. This adaptable architecture allows developers to effortlessly add functionality or make changes in the look of the website through addition of DotNetNuke applications. There are lots of websites where you can find free applications, you can use or customize these applications according to your need. That is reason DotNetNuke has become the first choice of developers.
DotNetNuke for End Users
DotNetNuke is very good tool for end users as they can within minutes post contents on the websites.This powerful and simple tool allows end users to modify the content without support from IT personnel.
Systems administrators find the granular security model very useful as they can define accessing rights for the end users. Both end users and administrators find it extremely helpful as the end users enjoys the freedom to post and modify content as per their wish and system administrators need not to be bothered about the rest of the website being modified as they have defined the extent of access.
We are in an era where internet is considered to be the principal source to find out reliable information. It gives you a platform to reach out to people and to know about their views also.People can write their views and it gets online for others to read.A positive article will absolutely add feather in your cap but a wrong or misleading one can spoil image of the company. Content Approval Workflow feature is the perfect solution for it and it takes web content controls one step ahead. In this your website is configured with custom approval workflows so whatever changes is made to the website, needs to be approved by authored person before it gets online. This helps you to monitor the quality and content of the article. This path breaking Content Approval Workflow feature is available in DotNetNuke Enterprise and Professional Editions.
DotNetNuke for Organization
Organization needs to make changes to websites on a regular basic. The flexible and reliable Content management platform of DotNetNuke allows organization to swiftly execute wining web strategies.Using DotNetNuke application you can easily control and change the look of the website.
The DotNetNuke Enterprise and Professional edition are reasonably priced and have very good technical support. Their free edition is known as Community Edition which you can download from internet and use it.
Augustus 5, 2014 09:01 by
KennyThe Reason Why Choose DotNetNuke for Your Business
DotNetNuke is one of the best open source Content Management Systems (CMS) available. When it comes to managing your website system, DNN consistently proves to be a top-level performer. Have a robust, full-featured site deployed in no time with DotNetNuke, one of the world's most trusted content management systems (CMS). While most other CMS's offer limited functionality, DotNetNuke's (DNN) free community version provides even more functions, such as events content, announcements, discussions, FAQ's and various customizable forms. This simply means much more power-packed features and options to complement your aggressive business.
Choose DNN for your new website, be it a corporate intranet, extranet or online store. It is one of the longest-running web development platforms, and indeed one of the most popular in the web development community. It is based on Microsoft's own robust web development framework, ASP.Net, which is one of the reasons why DNN-based sites and applications are fully customizable, SEO-friendly, stable and scalable.
The DotNetNuke development edge
DNN is an open-source CMS. This entails a lot of key advantages for both developers and clients.
Easy administration. Site administration is highly intuitive thanks to a user-friendly administrative interface. There is no technical programming knowledge required when managing your website. You can create, edit and publish content instantly and seamlessly.
Advanced features. A DNN page consists of modules, skins and other kinds of attachments. Many of them are packaged with the initial download. If what you need is not there, however, chances are one or more members of the online DotNetNuke development community has it. They may be downloadable for free or a minimal amount.
Features are constantly evolving thanks to this active online community.
Round-the-clock support. Although a core team of developers is always on hand to support users and programmers, there is an abundance of information and help references available through blogs, forums, online help, journals and other websites.
Fast development. DotNetNuke developers are able to finish projects in a short time due to the following reasons:
- The full application source code is open and accessible;
- Modules, applications and skins are readily available;
- Online support is always on hand, whether for technical assistance or looking for features.
Highly secure. Sites are safe and secure thanks to the validation, encryption and bug and potential threat tracking capabilities.
Completely customizable. To satisfy whatever need you may have, a DNN site is easily customizable on all levels, from font type, color, skin and modules. The best thing about it is that changes do not affect content at all.
DotNetNuke gets the job done affordably and in a short time You can liven up your online store or support your thriving business community through wide-access web portals built on this robust CMS. Contact a DotNetNuke developer today!
In today's world, sales is the most important source of revenue for any organization causing companies to incorporate innovative technologies such as dotnetnuke development services for the businesses. Dotnetnuke Developers are very helpful in maintaining your website. The end result - an enormous influx of potential customers that are converted into actual sales.
Julie 14, 2014 09:34 by
Kenny
How to Optimize Your DotNetNuke Site?
DotNetNuke or DNN is one of the best open source Content Management Systems (CMS) available. When it comes to managing your website system, DNN consistently proves to be a top-level performer. DotNetNuke makes it extremely easy to grant or deny access to pages on your site. The DotNetNuke store is also integrated into the CMS, giving you an end-to-end experience for gaining new features and extending DotNetNuke’s look and capabilities. In this article I wiil explain about how to optimize your DotNetNuke site.

Tips for Optimize Your DotNetNuke Site
Website performance is absolutely critical. Your website visitors become more demanding and less patient by the day. If pages don’t load quickly, you risk losing them. And, after they leave your site, they’ll tell others about it and they won’t come back. Website performance is important to search engines, as well. Google notes that they take site speed into account for search rankings.
First - Visit is the Host Settings page. There are a number of key updates and changes needed in this section.
Appearance, in this section you should uncheck the "Show Copyright Credits" box.
After that Advanced, choose Authentication Settings, in this section you should uncheck "Enabled" for any provider that will not be used in the portal, typically the LiveId and OpenId providers.
Next still Advanced, choose Performance Settings, in this section you should change the "Module Caching Method" to Memory. The "Performance Setting" to HeavyCaching. And the "Compression Setting" to GZip Compression.
The last for first step is still in Advanced, and choose Other Settings, in this section you should change the "Scheduler Mode" to Timer. You should enable the "Event Log Buffer" and disable the "Auto-Sync File System" option.
Second - Choosing the right DotNetNuke skin for fast load time. Generally, CSS-based skin layouts are safe bets, with menu components like Telerik and CSS NavMenu. Sometimes the skin is what can make the difference for your website’s load time. If you opt for a custom skin, make sure to choose a web designer who adheres to best practices.
Third - Optimize your images. Larger images result in longer load times. So pick the right size for the job. Also, choose the right image format for the job at hand. Be sure to resize images directly, rather than using HTML scaling. Setting width="600" height="220" doesn’t work well – and, you’re still forcing the larger file to be downloaded in full.
Fourth - Use a Content Delivery Network (CDN). Content Delivery Networks (CDN) can be effective for serving up static content, including images, multimedia and file downloads. They’re known for providing high availability and high performance. Their distributed nature means that content is being served up “closer” to the end user.
Fifth - Avoid bad requests. Check for HTTP 404 errors (“Page Not Found”) and avoid re-directs on resources. Also, monitor server errors and work with your developers to address any repeated errors.
Summary
There are some tips for optimize your DotNetNuke site. Many people charge a lot of money to make these simple performance tweaks and I just laid them all out on the table for you fre of charge. Feel free to share your comments below, if you have questions please visit the forums.
Junie 5, 2014 06:15 by
Ben
404 Handling is the process of managing what happens when a visitor comes to your site and enters a Url/follows a link which isn't valid. The correct handling of 404 errors can really mean the different between a professional looking site, and one that still looks like it is in development. The name ‘404 Error’ is used because the web server returns a response code of ‘404’, meaning it couldn't find a matching file/resource for the Url. A well developed 404 strategy will retain users, keep search engines up to date and in general make your site look like a polished and finished effort.

Here is the tips how to fix 404 Handling Error on DotNetNuke 7 :
Keep in mind that a prerequisite for this strategy is that you must be using ASP.Net 3.5 SP1 or later. This will not work in earlier .Net Framework versions. Look at the customErrors section below in web.config:

There are a few things to notice here. First, the addition of redirectMode=”ResponseRewrite”. This enables a rewrite of the error page rather than a redirect. The next thing to notice is the specific instruction on what page handles 404 errors. Rather than ‘TheErrorPage.aspx’, 404 errors are handled by ‘404.aspx’.
Now we get to some specifics in DNN. In your DNN site create 'TheErrorPage.aspx' and '404.aspx' (or whatever you want to name them) in the root of your website. From my testing this does not work if you were to add this as a page within DNN itself (i.e. via Pages → Add). Instead, manually add these error pages in the root of the site.
Lastly add this bit of code to the 404.aspx error page:
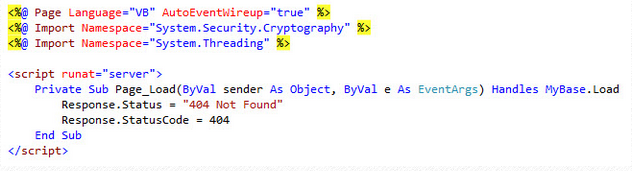
This code simply ensures a 404 status is returned when the page loads, which should only be for 404 errors. You could do this in C# as well. You can add any HTML you would like to this page so you can provide a friendly 404 error page.
404 Error on DNN 7 Installation
If you are encountering an issue with DNN 7 installations that causes most of DNN's URLs to result in 404 errors then please try to following fix.
Within your site's web.config file locate the opening tag for the "modules" section of the web.config file which is:
"<modules>" (without quaotation marks)
Then modify it so that it reads as follows:
"<modules runAllManagedModulesForAllRequests="true">" (without quotation marks)
Then save the web.config file and restart your site.
That should resolve the issue and allow your links and pages of your DNN 7 installation to resolve correctly.
Need DotNetNuke hosting? Please visit our site at http://www.asphostportal.com. Just with only $4.00/month to get DotNetNUke hosting. If you have any further questions, please feel free to email us at [email protected].
ASPHostPortal.com, Microsoft No#1 Recommended Spotlight Hosting Partner, is now providing this FREE DOMAIN and DOUBLE SQL Space promotion link for new clients to enjoy the company's outstanding web hosting service.
April 30, 2014 07:05 by
Kenny
DotNetNuke is a web content management system based on Microsoft .NET. The Community Edition is open source. DotNetNuke was written in VB.NET, though the developer has shifted to C# since version 6.0. It is distributed under both a Community Edition MIT license and commercial proprietary licenses as the Professional and Enterprise Editions.

In this article, I will explai n about how to allow large file uploads in DotNetNuke. Usually we come across the requests to set larger file uploads for the editor in DotNetNuke. The default setting allows you to upload 4mb which if you want to upload media files is not enough. Here are the changes required to upload larger files via editor and file manager in DotnetNuke.
The example is based on using the TelerikEditorProvider set as the default html editor for the site and is based on DNN 7.0
1. First, you must set the TelerikEditorProvider as the default editor for the site.
Under host HTML Editor Manager you can see the current provider and change it if required to TelerikEditorProvider

2. Set the default upload size for the file managers
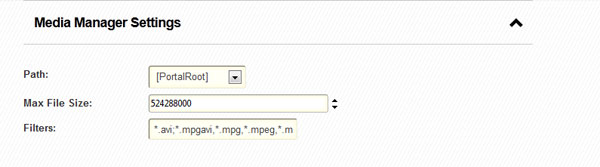
By clicking on everyone under Default Configuration you can access the editor settings. In the editor configuration tab you can allow additional file extensions (make sure they are set as allowed under host settings as well) and set the file upload size for all types of file managers.
The values are in bytes so for example 524288000 = 500mb.
Here are the settings for the Media Manager.
3. Change the ConfigDefault.xml values
If after this you still can see only 4mb as allowed file size in the editor you will have to digg in a bit deeper. Download (make sure you make the backup) ConfigDefault.xml from /Providers/HtmlEditorProviders/Telerik/Config/
Change the required manager properties
<property name="MediaManager.MaxUploadFileSize">4194304</property>
for 500mb upload change to
<property name="MediaManager.MaxUploadFileSize">524288000</property>
The values are in bytes 524288000 = 500mb
Save an upload to /Providers/HtmlEditorProviders/Telerik/Config/ overwiting the current file.
4. Changes in the web.config file
Make sure you make the back up and then find the following code
<!-- Forms or Windows authentication -->
<authentication mode="Forms">
<forms name=".DOTNETNUKE" protection="All" timeout="60" cookieless="UseCookies" />
</authentication>
<!--
<identity impersonate="true"/>
<authentication mode="Windows">
</authentication>
-->
<!-- allow large file uploads -->
<httpRuntime useFullyQualifiedRedirectUrl="true" maxRequestLength="8192" requestLengthDiskThreshold="8192" />
First change
<forms name=".DOTNETNUKE" protection="All" timeout="60" cookieless="UseCookies" />
to
<forms name=".DOTNETNUKE" protection="All" timeout="9000" cookieless="UseCookies" />
This will prevent the timeout during upload, the value is in seconds.
After that change
<httpRuntime useFullyQualifiedRedirectUrl="true" maxRequestLength="8192" requestLengthDiskThreshold="8192" />
to
<httpRuntime useFullyQualifiedRedirectUrl="true" maxRequestLength="512000" requestLengthDiskThreshold="512000" />
This value is in kilobytes 512000 = 500mb
In some cases this should be all, however if you receive I/O error during upload there is another line of code you need to add in web.config
in
<configuration>
<system.web> section.
<configuration>
...
<system.web>
<httpRuntime maxRequestLength="512000" executionTimeout="9000" />
...
</system.web>
</configuration>
The maxRequestLength value is in kilobytes 512000 = 500mb
5. Changes in IIS7
Sometimes in IIS7 and if you have access to the server you may need to check that the overrideModeDefault property is set to to "Allow" in C:\Windows\System32inetsrv\config\applicationHost.config
<section name="requestFiltering" overrideModeDefault="Allow" />
Following these steps you should be able to set the file upload limits up to 2GB.
April 2, 2014 09:56 by
Kenny
Good news, no you can adapt DotNetNuke portal to mobile devices without changing your existing desktop experience. The latest trend in web development is exciting to say the least - with increasing in Mobile device penetration around the globe. Mobile devices already have displaced many of the fixed-location technologies especially in rural in developed world or countries like India Brazil and China that are currently filling the global economic growth. MobiNuke is exposing a rich set of mobile device capabilities available to be used by module or skin developers.
Main Features
- You will apply separate skins for mobile experience.
It can be when you want to set different skins that will be applied when pages are accessed from mobile devices. Don’t worry it will not change the skin for your desktop browsers. And now skin designers can develop mobile friendly skin sets together with desktop skins.
- Mobile devices access the portal through a lighter page.
It will be fast, because anything that is not needed by a mobile device is cleaned out. The content type and MIME type are set to specific values for mobile browsers.
- It’s up to you for enable or disable any existing modules for mobile context or for PC.
You can set some modules to show only on PC and others only on mobile devices. You can do different set up for each page.
- Support for mobile versions of existing modules.
Developers can extend their modules for mobile context.
- Expose mobile device capabilities.
Developers can get properties such as device type, screen dimensions, if JavaScript or online video is supported and more than 500 other mobile device properties.
How to Make it Work
- Download and install MobiNuke through Host->Module Definitions-> Install New Module.
- Add mobiNuke to any page. It will add itself to all the pages and will act as an extra setting.
- Click on Mobile Settings to configure general settings and page specific settings for mobile access.
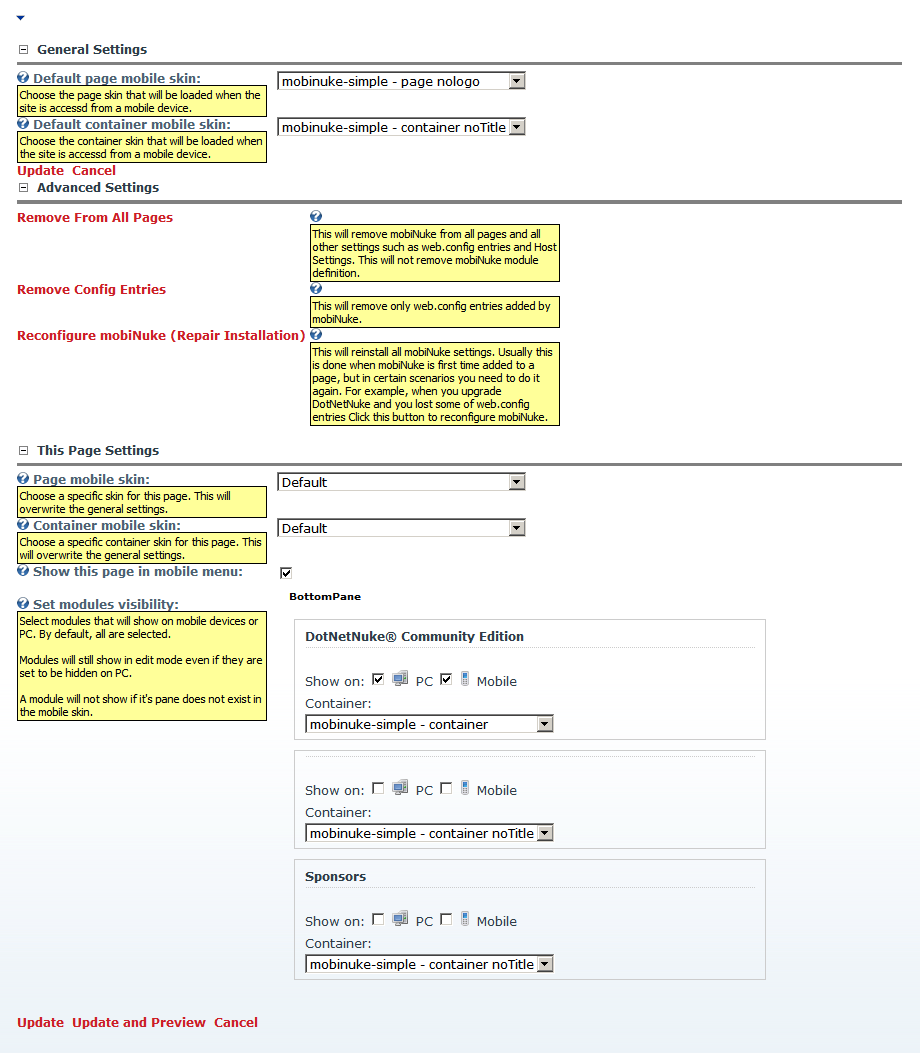
Technical Details
MobiNuke contains 5 components:
- A httpModule that redirects request coming from a mobile device to DefaultMobi.aspx
- A DotNetNuke Module with the following functions:
- When added for the first time it will auto-configure itself to be present on all pages;
- Manage the skin to be loaded when the page is accessed from a mobile device;
- Preview the page close to the way it looks on a mobile device;
- Enable or disable tab modules for mobile pages;
- A DefaultMobi.aspx page for mobile context that has the same function as Default.aspx. Anything that is not usable on mobile devices is cleaned out.
- A set of minimal skins suitable for mobile browsing. Currently the mobile skin contains only the ContentPane. It only shows the corresponding modules from the ContentPane of the desktop skin.
- A mobile friendly navigation provider.
Maart 19, 2014 08:42 by
Kenny
Bootstrap is a free collection of tools for creating websites and web applications. It contains HTML and CSS-based design templates for typography, forms, buttons, navigation and other interface components, as well as optional JavaScript extensions.

Twitter's Bootstrap is an excellent set of carefully crafted user interface elements, layouts, and javascript tools, freely available to use in your next web design project. This video series aims to introduce you to Bootstrap; taking you all the way from downloading the resources, to building a complete Bootstrap-based website.
While in the process of developing our own Responsive Twitter Bootstrap Skin for DotNetNuke 7, we had to jump over a couple of hurdles. First we had to figure out how to implement a dropdown on hover menu. Secondly, we had to overcome the Bootstrap issue where once you are on a child page, you cannot navigate back to the parent page in the menu. Bootstrap is against both of these features, however we feel as though these features provide a user friendly interface, especially while using a tablet or smartphone. With that said, we wrote this article to save you the headache to incorporate these two features in your Responsive Twitter Bootstrap Skin for DotNetNuke 7.

The real beauty was that I realized, I had included both the data-toggle="dropdown" and the data-hover="dropdown". You must only use the data-hover="dropdown" to fix both issues! The correct code is below:

Now you will have dropdown on hover menu items AND will be able to navigate to the parent page from the child page.
Maart 19, 2014 08:42 by
KennyBootstrap is a free collection of tools for creating websites and web applications. It contains HTML and CSS-based design templates for typography, forms, buttons, navigation and other interface components, as well as optional JavaScript extensions.
Twitter's Bootstrap is an excellent set of carefully crafted user interface elements, layouts, and javascript tools, freely available to use in your next web design project. This video series aims to introduce you to Bootstrap; taking you all the way from downloading the resources, to building a complete Bootstrap-based website.
While in the process of developing our own Responsive Twitter Bootstrap Skin for DotNetNuke 7, we had to jump over a couple of hurdles. First we had to figure out how to implement a dropdown on hover menu. Secondly, we had to overcome the Bootstrap issue where once you are on a child page, you cannot navigate back to the parent page in the menu. Bootstrap is against both of these features, however we feel as though these features provide a user friendly interface, especially while using a tablet or smartphone. With that said, we wrote this article to save you the headache to incorporate these two features in your Responsive Twitter Bootstrap Skin for DotNetNuke 7.
The real beauty was that I realized, I had included both the data-toggle="dropdown" and the data-hover="dropdown". You must only use the data-hover="dropdown" to fix both issues! The correct code is below:
Now you will have dropdown on hover menu items AND will be able to navigate to the parent page from the child page.