DotNetNuke Hosting with ASPHostPortal.com

BLOG about DotNetNuke CMS, latest technology and Special DotNetNuke Hosting Package with ASPHostPortal.com

DotNetNuke 7.0 Hosting - ASPHostPortal.com :: GZIP Compression to Improve Your DotNetNuke Performance

clock Februarie 11, 2014 07:47 by author Jervis

In this article, I want to describe about IIS SEO Toolkit and the YSlow plugin for FireFox. The SEO Toolkit is invaluable for finding things like broken links, bad markup, etc, while the YSlow plugin analyzes things from a pure performance perspective. I recommend both highly for fine tuning your DotNetNuke websites.

One of the things that YSlow recommends is to compress the files that are sent from the server to the user’s web browser. DotNetNuke provides the option to use GZip compression on the Host Settings page. Turning this feature on is one of the first things I do when I set up a new DotNetNuke installation.

YSlow has the following to say about compression:

“Compression reduces response times by reducing the size of the HTTP response. Gzip is the most popular and effective compression method currently available and generally reduces the response size by about 70%. Approximately 90% of today's Internet traffic travels through browsers that claim to support gzip.”

That’s great! Unfortunately, not every file on your DotNetNuke site is compressed when you enable that setting at the host level. In fact, in a test against a recent version of DotNetNuke in my local environment, YSlow reports 18 components that should be compressed. When you enable GZip compression in the DotNetNuke Host Settings, that number drops to…..17. This is due to the actual page itself being compressed (which is wonderful, don’t get me wrong). But what are the other 17 components? Static files. Namely JavaScript files (.js) and Cascading Style Sheets (.css).

Now, the fact that there so many external files its an altogether different issue that I will side-step for the purpose of this blog post. Of course I would love it if DNN had 1 dynamically created minified JS file and 1 dynamically created CSS file, period. However, that is currently not the case, and even if it was – wouldn’t you want to gzip those files as well?

Here is the compression report from a recent version of DotNetNuke that has GZip enabled:
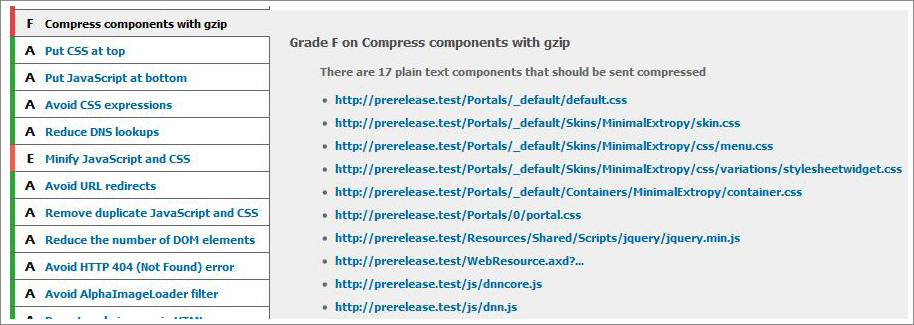
You can see that DotNetNuke does pretty darn well with respect to the YSlow configuration, except where it comes to dealing with external files (this report was run with the “Small Site or Blog” ruleset, for those that are curious). So, how can I improve this section of the YSlow report? By letting IIS gzip the static files, of course!

The report above is from a local environment, but this is exactly how dnnGallery.net behaved prior to implementing some Gzip compression in IIS.

The steps that I used to get IIS to perform GZip compression on all of the static files in my website were as follows:

1. Enable static file compression in IIS
2. Install IIS Resources
3. Add the appropriate file extensions using the IIS Metabase Explorer
4. Restart IIS

Enabling static file compression in IIS

So, first I enabled IIS compression of static files. Note that this is a server-wide solution, and will apply to each of your web sites hosted in IIS. Here are the relevant steps from the MSDN documentation:

To enable server-wide HTTP compression

1. In IIS Manager, expand the local computer, right-click the Web Sites folder, and then click Properties.

2. Click the Service tab, and in the HTTP compression section, select the Compress application files check box to enable dynamic compression.

3. Select the Compress static files check box to compress static files.

4. In the Temporary directory box, type the path to a local directory or click Browse to locate a directory. Once a static file is compressed, it is cached in this temporary directory until it expires, or the content changes. The temporary directory must be on a local drive on an NTFS-formatted partition. The directory cannot be compressed, and should not be shared.

5. Under Maximum temporary directory size, click a folder size option. If you click the Limited to (in megabytes) option and enter a number in the text box next to it, IIS automatically cleans up the temporary directory according to a least recently used rule when the set limit is reached.

6. Click Apply, and then click OK.

After I performed this step, only one random .txt file was compressed, how useful! You can check which files are compressed by looking in the temporary folder that was specified in the above steps.

Add file extensions using the Metabase Explorer

After I installed the resource kit tools, I opened the new Metabase Explorer application from my start menu and performed the following steps:

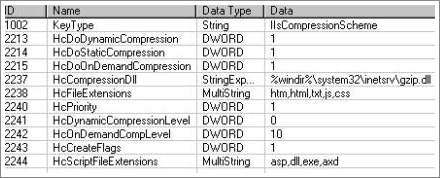
1. Expanded [Machine Name] –> W3SVC –> Filters –> Compression and selected gzip
2. For the row named “HcFileExtensions” I added “js” and “css” to the “Data” list
3. For the row named “HcScriptFileExtensions” I added “axd” to the “Data” list
Run it and you’ll see the result


DotNetNuke Hosting - ASPHostPortal.com :: Setting Up Your DotNetNuke 7 Development Environment Setup (DES)

clock November 27, 2013 06:15 by author Ben

To develop modules for DotNetNuke you must first have a DotNetNuke installation running on the computer on which you intend to develop them. Setting up your development environment can vary based on what your end goal is. If you are doing module development for your own use, and within your own DNN environments, you can ignore a few of the settings below. If you are doing module development with the idea that you might turn around and give the modules away, or sell them, then you will likely want to follow the guidelines set forth below to support the widest array of DNN installation environments.

I recommend that each developer have their own local development environment, with a local IIS website running DotNetNuke, and a SQL Server 2008/2012 (not express, though you can use it) database for the website. Having an individual development environment makes group module development far easier than if you share environments/databases.

The steps for setting up your development environment will apply to both the Community and Professional editions of DotNetNuke.

Installation Configuration

Once you have the version selection out of the way you can go through the installation process. While I’m not going to walk you through the minutest of details of each step of installing DotNetNuke in this post, I will at least try to point you in the right direction for each step. Download the INSTALL package of the version of DotNetNuke you want to use in your development environment. Extract the files in the INSTALL package to a location of your choosing, this location is where you will point IIS (the web server) when we can configure the website. In my environment I typically use c:\web\dnnme.com\ (One item of note: you may need to right click on the ZIP file and choose Properties before extracting, on the properties window if you have an UNBLOCK option, click that. Some versions of Windows have started blocking files within the DotNetNuke ZIP files, which will cause you problems later during the actual install.)


Setup IIS

IIS is the web server that comes with Windows computers. DNN 7 requires IIS 7 or later (7,7.5,8.0), so you will need at least Windows Vista, Windows 7, Windows 8, or Windows Server 2008 R2, Windows Server 2012. In IIS you should create a new website (Note: If you use an existing website in IIS be sure to add the HOST binding for DNNME.COM), and point to the folder where you extracted the INSTALL package.

Note: With DotNetNuke 7.0+, .NET Framework 4.0 is required, so be sure that your application pool is configured to run under 4.0, and not 2.0.
Set File Permissions

Setting up the file permissions for your DNN install is often the step that causes the most trouble. You should right click on the FOLDER in which you extracted DNN (c:\web\dnnme.com\) and choose properties. Choose the Security tab. You need to add permissions for the account in which your website's application pool is running under. You will want to setup the permissions to give the account Full or Modify permissions for the DNNME.COM folder. Which account you will use will vary based on your version of IIS, here’s a simple list of some of the default accounts based on the version of IIS.

  • IIS Version Operating System Account
  • IIS 7 Windows Vista, Windows Server 2008 localmachine\Network Service
  • IIS 7.5 Windows 2008 R2, Windows 7 IIS AppPool\APPPOOLNAME
  • IIS 8 Windows 2012, Windows 8 IIS AppPool\APPPOOLNAME

Note: If you are using IIS7.5/8.0 you’ll notice in the above table that we have APPPOOLNAME in the identity, this is because when you setup a new website in IIS a new application pool is created. In place of you should type in the name of the application pool that was created. You can also bypass this and configure your application pool to use the Network Service account instead of a dynamic account if you would like.

Database Configuration

In SQL Server you should go through and create a new database. I always create a database with the same name as the website, so in this case DNNME.COM. Once you have created the database, create a user that can access that database. I always use SQL authentication, turn off the enforce password requirements, and give the user DB Owner and Public access to the DNNME.COM database. Remember the username and password you create here as you will need them when you walk through the Installation screen for DotNetNuke.

DotNetNuke Installation Screen

Populate the installation screen with the standard DNN information, Host username, password, etc. For the Database option, choose Custom and configure your database connection, providing the Server IP/Name, the Database name (dnndev.me). For the database authentication you'll want to choose the option that allows you to enter the username/password for the database user that you created previously.
Now there are two additional options you can configure, normally I would tell you not to modify these, but from a development environment perspective I do recommend that you change the objectQualifier setting. It should be blank by default, you should type in “dnn” (without quotes), this will prepend “dnn_” to all of the objects that get created by DNN such as Tables and Stored Procedures. This is not something I recommend from a production stand point, but if you are developing modules for sale, then supporting objectQualifier in your development is recommended. It will save you time down the road if you have a customer who has an objectQualifier defined on their production databases.


About ASPHostPortal.com

We’re a company that works differently to most. Value is what we output and help our customers achieve, not how much money we put in the bank. It’s not because we are altruistic. It’s based on an even simpler principle. "Do good things, and good things will come to you".

Success for us is something that is continually experienced, not something that is reached. For us it is all about the experience – more than the journey. Life is a continual experience. We see the Internet as being an incredible amplifier to the experience of life for all of us. It can help humanity come together to explode in knowledge exploration and discussion. It is continual enlightenment of new ideas, experiences, and passions

Author Link


 photo ahp banner aspnet-01_zps87l92lcl.png

Corporate Address (Location)

ASPHostPortal
170 W 56th Street, Suite 121
New York, NY 10019
United States

Tag cloud

Sign in