
Augustus 23, 2014 09:00 by
 Kenny
Kenny
DotNetNuke is an open source CMS based on Microsoft .Net technology. DotNetNuke can be easily installed and hosted. In general, DotNetNuke framework allows individuals to do whatever they wish with the application framework both commercially and non-commercially, with the simple requirement of giving credit back to the DotNetNuke project community. In this article, I will tell you how to automate the packaging of your DNN Module.
DotNetNuke is a program that runs on Microsoft ASP.NET. It is also a framework, meaning, it is a program that is designed to be extended. One of the ways you extend the framework is to create modules. These modules are installed inside a DotNetNuke installation and when they run in that DotNetNuke installation they extend the framework to create a DotNetNuke website also called a portal.
Here are the steps for automate the packaging of your DNN Module:
- Delete all source code and start over from scratch with my templates installed. If you really don’t want to go through step #1, you can skip it, but you must then go on to Step 2 below
- Open your project in Visual Studio
- Install the MSBuildTasks project from Nuget:
PM> Install-Package MSBuildTasks
- Create a BuildScripts folder in your project
ModulePackage.targets
MSBuild.Community.Tasks.Targets
- Right click on the project in Visual Studio Solution Explorer and choose “Unload Project”
- Right click on the unloaded project and choose the Edit option
- At the bottom of the file, before the </Project> section add
<PropertyGroup>
<Extension>zip</Extension>
<DNNFileName>CHANGEME.dnn</DNNFileName>
<PackageName>CHANGEME</PackageName>
<MSBuildCommunityTasksPath>$(SolutionDir)\Build</MSBuildCommunityTasksPath>
</PropertyGroup>
<Import Project="BuildScripts\ModulePackage.Targets" />
<Target Name="AfterBuild" DependsOnTargets="PackageModule">
</Target>
<Import Project="$(SolutionDir)\.nuget\nuget.targets" />
- Change the “CHANGEME” text to match the name of your .DNN file and the name of the ZIP file that you want the package created as.
- Save the Project changes.
- Right click on the project in Solution Explorer and choose Reload Project.
- Switch into Release mode in Visual Studio and do a Build of your project.
- This should create two files, ModuleName_Version#_Install.zip and ModuleName_Version#_Source.zip.
What I typically do then is install the module to a test DNN install to make sure that everything is working correctly. You’ll want to make sure that the ZIP files created contain all the right files, and they get installed correctly, so a test installation is the best way to go through that process.
If something fails, try to track it down, then do another Build in Release mode, rinse and repeat the installation process in your test install until you get everything working properly.
Now going forward, after you do a release, you go into your AssemblyInfo file, change your version number there, and into your .DNN File and change your Version number there. Next time you build in Release mode the module will create a new VERSION number ZIP file, leaving your last version builds there as well.
Junie 5, 2014 06:15 by
Ben
404 Handling is the process of managing what happens when a visitor comes to your site and enters a Url/follows a link which isn't valid. The correct handling of 404 errors can really mean the different between a professional looking site, and one that still looks like it is in development. The name ‘404 Error’ is used because the web server returns a response code of ‘404’, meaning it couldn't find a matching file/resource for the Url. A well developed 404 strategy will retain users, keep search engines up to date and in general make your site look like a polished and finished effort.

Here is the tips how to fix 404 Handling Error on DotNetNuke 7 :
Keep in mind that a prerequisite for this strategy is that you must be using ASP.Net 3.5 SP1 or later. This will not work in earlier .Net Framework versions. Look at the customErrors section below in web.config:

There are a few things to notice here. First, the addition of redirectMode=”ResponseRewrite”. This enables a rewrite of the error page rather than a redirect. The next thing to notice is the specific instruction on what page handles 404 errors. Rather than ‘TheErrorPage.aspx’, 404 errors are handled by ‘404.aspx’.
Now we get to some specifics in DNN. In your DNN site create 'TheErrorPage.aspx' and '404.aspx' (or whatever you want to name them) in the root of your website. From my testing this does not work if you were to add this as a page within DNN itself (i.e. via Pages → Add). Instead, manually add these error pages in the root of the site.
Lastly add this bit of code to the 404.aspx error page:
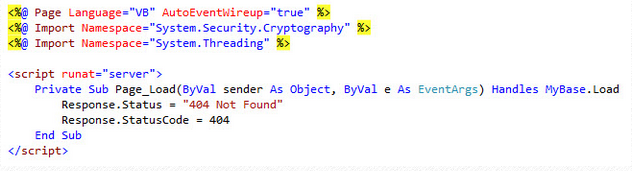
This code simply ensures a 404 status is returned when the page loads, which should only be for 404 errors. You could do this in C# as well. You can add any HTML you would like to this page so you can provide a friendly 404 error page.
404 Error on DNN 7 Installation
If you are encountering an issue with DNN 7 installations that causes most of DNN's URLs to result in 404 errors then please try to following fix.
Within your site's web.config file locate the opening tag for the "modules" section of the web.config file which is:
"<modules>" (without quaotation marks)
Then modify it so that it reads as follows:
"<modules runAllManagedModulesForAllRequests="true">" (without quotation marks)
Then save the web.config file and restart your site.
That should resolve the issue and allow your links and pages of your DNN 7 installation to resolve correctly.
Need DotNetNuke hosting? Please visit our site at http://www.asphostportal.com. Just with only $4.00/month to get DotNetNUke hosting. If you have any further questions, please feel free to email us at [email protected].
ASPHostPortal.com, Microsoft No#1 Recommended Spotlight Hosting Partner, is now providing this FREE DOMAIN and DOUBLE SQL Space promotion link for new clients to enjoy the company's outstanding web hosting service.