
Julie 14, 2014 09:34 by
 Kenny
Kenny
How to Optimize Your DotNetNuke Site?
DotNetNuke or DNN is one of the best open source Content Management Systems (CMS) available. When it comes to managing your website system, DNN consistently proves to be a top-level performer. DotNetNuke makes it extremely easy to grant or deny access to pages on your site. The DotNetNuke store is also integrated into the CMS, giving you an end-to-end experience for gaining new features and extending DotNetNuke’s look and capabilities. In this article I wiil explain about how to optimize your DotNetNuke site.

Tips for Optimize Your DotNetNuke Site
Website performance is absolutely critical. Your website visitors become more demanding and less patient by the day. If pages don’t load quickly, you risk losing them. And, after they leave your site, they’ll tell others about it and they won’t come back. Website performance is important to search engines, as well. Google notes that they take site speed into account for search rankings.

First - Visit is the Host Settings page. There are a number of key updates and changes needed in this section.
Appearance, in this section you should uncheck the "Show Copyright Credits" box.
After that Advanced, choose Authentication Settings, in this section you should uncheck "Enabled" for any provider that will not be used in the portal, typically the LiveId and OpenId providers.
Next still Advanced, choose Performance Settings, in this section you should change the "Module Caching Method" to Memory. The "Performance Setting" to HeavyCaching. And the "Compression Setting" to GZip Compression.
The last for first step is still in Advanced, and choose Other Settings, in this section you should change the "Scheduler Mode" to Timer. You should enable the "Event Log Buffer" and disable the "Auto-Sync File System" option.
Second - Choosing the right DotNetNuke skin for fast load time. Generally, CSS-based skin layouts are safe bets, with menu components like Telerik and CSS NavMenu. Sometimes the skin is what can make the difference for your website’s load time. If you opt for a custom skin, make sure to choose a web designer who adheres to best practices.
Third - Optimize your images. Larger images result in longer load times. So pick the right size for the job. Also, choose the right image format for the job at hand. Be sure to resize images directly, rather than using HTML scaling. Setting width="600" height="220" doesn’t work well – and, you’re still forcing the larger file to be downloaded in full.
Fourth - Use a Content Delivery Network (CDN). Content Delivery Networks (CDN) can be effective for serving up static content, including images, multimedia and file downloads. They’re known for providing high availability and high performance. Their distributed nature means that content is being served up “closer” to the end user.
Fifth - Avoid bad requests. Check for HTTP 404 errors (“Page Not Found”) and avoid re-directs on resources. Also, monitor server errors and work with your developers to address any repeated errors.
Summary
There are some tips for optimize your DotNetNuke site. Many people charge a lot of money to make these simple performance tweaks and I just laid them all out on the table for you fre of charge. Feel free to share your comments below, if you have questions please visit the forums.
April 30, 2014 07:05 by
Kenny
DotNetNuke is a web content management system based on Microsoft .NET. The Community Edition is open source. DotNetNuke was written in VB.NET, though the developer has shifted to C# since version 6.0. It is distributed under both a Community Edition MIT license and commercial proprietary licenses as the Professional and Enterprise Editions.

In this article, I will explai n about how to allow large file uploads in DotNetNuke. Usually we come across the requests to set larger file uploads for the editor in DotNetNuke. The default setting allows you to upload 4mb which if you want to upload media files is not enough. Here are the changes required to upload larger files via editor and file manager in DotnetNuke.
The example is based on using the TelerikEditorProvider set as the default html editor for the site and is based on DNN 7.0
1. First, you must set the TelerikEditorProvider as the default editor for the site.
Under host HTML Editor Manager you can see the current provider and change it if required to TelerikEditorProvider

2. Set the default upload size for the file managers
By clicking on everyone under Default Configuration you can access the editor settings. In the editor configuration tab you can allow additional file extensions (make sure they are set as allowed under host settings as well) and set the file upload size for all types of file managers.
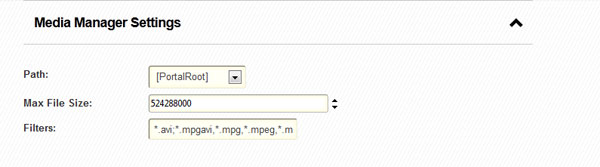
The values are in bytes so for example 524288000 = 500mb.
Here are the settings for the Media Manager.
3. Change the ConfigDefault.xml values
If after this you still can see only 4mb as allowed file size in the editor you will have to digg in a bit deeper. Download (make sure you make the backup) ConfigDefault.xml from /Providers/HtmlEditorProviders/Telerik/Config/
Change the required manager properties
<property name="MediaManager.MaxUploadFileSize">4194304</property>
for 500mb upload change to
<property name="MediaManager.MaxUploadFileSize">524288000</property>
The values are in bytes 524288000 = 500mb
Save an upload to /Providers/HtmlEditorProviders/Telerik/Config/ overwiting the current file.
4. Changes in the web.config file
Make sure you make the back up and then find the following code
<!-- Forms or Windows authentication -->
<authentication mode="Forms">
<forms name=".DOTNETNUKE" protection="All" timeout="60" cookieless="UseCookies" />
</authentication>
<!--
<identity impersonate="true"/>
<authentication mode="Windows">
</authentication>
-->
<!-- allow large file uploads -->
<httpRuntime useFullyQualifiedRedirectUrl="true" maxRequestLength="8192" requestLengthDiskThreshold="8192" />
First change
<forms name=".DOTNETNUKE" protection="All" timeout="60" cookieless="UseCookies" />
to
<forms name=".DOTNETNUKE" protection="All" timeout="9000" cookieless="UseCookies" />
This will prevent the timeout during upload, the value is in seconds.
After that change
<httpRuntime useFullyQualifiedRedirectUrl="true" maxRequestLength="8192" requestLengthDiskThreshold="8192" />
to
<httpRuntime useFullyQualifiedRedirectUrl="true" maxRequestLength="512000" requestLengthDiskThreshold="512000" />
This value is in kilobytes 512000 = 500mb
In some cases this should be all, however if you receive I/O error during upload there is another line of code you need to add in web.config
in
<configuration>
<system.web> section.
<configuration>
...
<system.web>
<httpRuntime maxRequestLength="512000" executionTimeout="9000" />
...
</system.web>
</configuration>
The maxRequestLength value is in kilobytes 512000 = 500mb
5. Changes in IIS7
Sometimes in IIS7 and if you have access to the server you may need to check that the overrideModeDefault property is set to to "Allow" in C:\Windows\System32inetsrv\config\applicationHost.config
<section name="requestFiltering" overrideModeDefault="Allow" />
Following these steps you should be able to set the file upload limits up to 2GB.